Search This Blog

Showing posts with label female sketch. Show all posts

How to make a real eye in Photoshop?

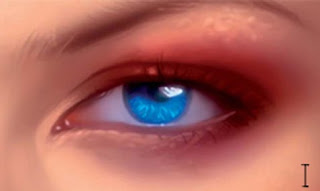
Note: follow the image sequence (A,B,........, I)
Sketch
Before laying down a single brushstroke, it’s important for me to create a rough sketch. It doesn’t have to be perfect, but we need to get our point across here. This will only make things easier during the painting process. Create a new layer and sketch in an eye.
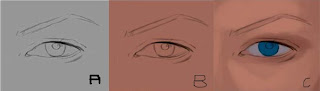
Laying down the Base Color This step is simple enough; here we lay down the base color for the skin. Simply use the Gradient tool here and fill the background layer with your color choice. In general try not to go too light or too saturated here.
Defining Form
Using the HSB Slider, (Windows>Color), pick a darker more saturated color for the darker areas of the skin, and paint it using a simple Hard Edged brush. I also pick a lighter, less saturated tone for the highlights of the skin. I choose a color for the eye, in this case, a bright blue and paint that in as well. Bringing Life to the Skin
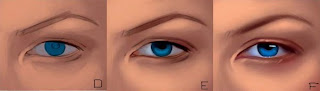
The values of the skin need some work here. I choose an even brighter, lighter color to define the form of the skin. I introduce the lighter tones according to the lighting here, which is a standard front light. I add the lighter tones to the tone, the bridge of the nose, near the eyebrow, and around the eyelid to make things appear more realistic.
Smoothing Out the Skin
At this point, all my work was done using a standard Hard Edged brush, which is great for defining form quickly. To blend the skin and give it a more photo realistic look, I now switch to a soft brush (Hardness at 0%) and Opacity at 50%. I blend all the sharp transitions until things appear much smoother. Additionally, I paint darker tones on the blue iris to give it more depth.
Bringing More Life
At this point I work a bit more on the skin tones, adding some more saturated reddish tones on the area around the eye, as well as the cheek. I also add a more saturated blue to the eye as well. I do this all with a soft airbrush at a fairly low opacity on a new layer, then merge it down when I’m satisfied with how things are looking. I also do some more detail work using a softer Hard Edged brush as well. Details
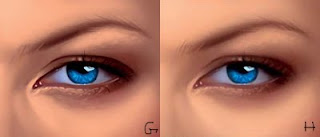
I’m satisfied with how things are looking at this stage, so I start working on the details. Using a fairly small brush, I begin to add some ‘bumps’ around the eye to give it a more realistic looks. I also create bumps around the eyebrow using a both a fairly light as well as dark color to help it pop for a realistic look. I also add details in the iris using a lighter bluish color to really bring the image to life. I work in at a very large zoom at this stage as well to make things easier and more accurate.
Refinement
I go over everything with a Soft Edged brush at a low opacity for a more realistic look. Additionally I bring out the details more using fairly small, hard edged brushes. I work on the eyebrow, painting each strand in, as well as the eyelashes.
Color and Texture Enhancement
Things are looking a bit too muddy for my taste, so what I do here is create a new layer set to soft light, and enhance the colors quite a bit. I introduce much warmer tones around the eye to give it more life. Finally, I slightly overlay a leather photo texture to give the skin a slightly more realistic effect.
Photoshop: Creating a sketch from a photo.

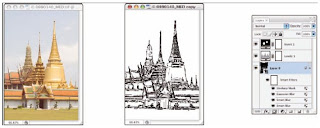
Simulating a painting in Photoshop is great, but sometimes you might need line art or a sketch. Photoshop has a couple of filters that do a nice job of creating pencil sketches, but none of them really do a great job with outlines. Here’s an easy way to create line art from a photo (see Figure A).


1. Open a copy of your image and create a Smart Object. Again, pen your image as a Smart Object or convert with the command Layer>Smart Objects>Convert to Smart Object before. When working with Smart Filters, you can later — if necessary — reopen the filter and change the settings

2. Apply the Smart Blur filter.
Set the filter to Quality: High and Mode: Normal. Use settings that remove all the tiny detail in your image (such as pores and individual hairs or blades of grass) but maintain edges and major detail (such as eyes, noses, golf balls, and trees).
3. Define edges with Smart Blur.
Reopen the Smart Blur dialog box and set the Mode pop-up menu to Edge Only. Adjust the sliders until the white-on-black preview shows approximately the amount of detail you want in the final image; then click OK.
4. Invert the colors.
Using the button at the bottom of the Layers palette or the Layer>New Adjustment Layer menu, add an Invert adjustment layer. (Not only is it a good idea to use adjustment layers rather than adjustment commands, but you’ll find that you can’t use most adjustment commands with Smart Objects.)
5. Blur the lines.
Click the Smart Object layer again in the Layers palette to make it active and apply a 1- or 2-pixel Gaussian Blur to soften the edges of the lines. 6. Adjust the thickness of the lines with a Levels adjustment layer. In the Levels dialog box, drag the middle slider control left and right until you’re satisfied with the image’s appearance. If desired, you can further refine the sketch with the Sharpen>Unsharp Mask filter.

How to make a female body?

Q: How to make a female body?

A:
I am going to begin this tutorial by addressing one of the most commonly asked questions that I receive: how to draw women's breasts (heh, I never thought I'd actually be making a tutorial about this. One of the most important things you should consider is to make your subject look natural; you can draw an attractive female without making her look like a "silicon implant ad.
The main problems people seem to have with drawing breasts are the shape and the placement. A lot of artists (professionals as well as ametuers) make them look like balloons that have been taped onto the subject's chest; this is hardly a natural look. If you look through figure drawing books, you'll see that they are more like halves of a sphere or overturned teacups rather than balloons.
Now, note the position. Imagine a central guideline that runs down the center of your subject's body, as shown at the left. The breasts are at 45 degree angles from that center line, and are about halfway down the chest (shown by the red diagonalguidelines). Be very careful not to draw them too close together or too far apart, or too high on the chest; these are commonly made mistakes. As you will see in examples below, this basic rule of the 45 degree placement will apply to prettymuch whatever pose you are using.
Note how the breasts are still located at 45 degree angles from the center line of the body. Oh, also take note of the shading. After looking at various examples, I find that shading in this fashion (rather than just following the lower curves as you would shade a sphere) makes them look more natural.
Here is one last pose to go over the size and placement. It's harder to see here, but the breasts are still at the 45 degree angle from the center line. The leftmost breast is to draw as a half-sphere, not as a full sphere. If you want to exaggerate the size, that's your choice, but I personally don't think its necessary.
Now, lets move on to the neck and shoulders. When you draw the shoulders, notice that they are slope down smoothly, they aren't flat. Try to take the musculature structure of the neck and shoulders into consideration, especially if you are going for a more realistic look. They should be shaped more like a clothes hanger, and not drawn flat an hard.
One more thing I wanted to cover regarding the torso is how to draw it if an arm is lifted. I have personally found this difficult sometimes, so I figured it was a good thing to go over. If the arm is lifted, then the back of the torso will be exposed. Although a female's torso isn't as round and full as a males, it should still stick out in the back. Don't make the upper torso too narrow. Notice also how the top of the right-most breast doesn't just keep curving inwards in a circle; remember that it is not a full sphere, so it is attached to the muscles of the shoulder.
Next, let's move on to the arms. The arms consist of three basic sections: the upper arm, the foream, and the hand. Each can be represented in prelimiary sketches by oval shapes. Now, I know some people don't like using the shapes; you do not have to do it this way, this is just one possible way to go about sketching arms. Some books recommend using cylinders, but it's better to use flat ovals because they more closely match the shape of the arm. If the arms are held loosely at the side, the hands should come down to the middle of the thigh. The elbows should be at about waist length.
Once you have your basic shapes of the arms down, you can refine them and make them look more realistic. This is a little more difficult. When drawing the arms, don't make them straight and flat; arms have muscles, after all. Never draw a straight arm as just a long cylinder (unless you are doing a super-deformed/chibi pic). The arm starts at the shoulder. Notice how the shoulder bulges out slightly, then curves back down. The arm tapes slightly inwards until you reach the elbow. At the elbow, the arm widens again just after the elbow where the biceps are. The elbow itself can be a little daunting to draw. Remember that the arm doesn't just start curving in the other direction; there is a joint, and it should be shown.
There are more examples below. Here are some more poses for arms, this time showing how the parts of the arm overlap. It issometimes easier to visualize the overlapping or foreshortening if you use basic oval shapes first, but again, you do not have to use them if you do not want to. Notice how in the topmost picture, the arm that is moving away from us tapers and grows smaller the further away from us it is. These poses are a little more difficult to refine. It is very important that you pay close attention to the way each par of the arm is facing, and how the elbow is to be positioned. Try to imagine the arm as two different shapes stuck together: the cylindrical upper arm, and the forearm, which is sort of shaped like a bowling pin with a bump on the bottom.
That should help you in determining the position of the elbow. Legs can be another problem area for artists. It's hard to make them shaped properly (especially when you don't practice very much, like me...) Just like with the arms, it is important not to make them perfectly straight like cyliders. It is especially helpful to use ovals to help you get the shape right rather than cylinders, because the ovals better suit the shape of the thighs and calves. The upper part of each leg should be thicker, rounder, and shorter than the lower part of leg. When drawing the legs, start them thicker at the top, then taper them down until the reach the knee. As with the elbow on the previous page, the knee should be defined; it's a joint and should be drawn, the leg isn't made of rubber. Notice how the knee bulges outwards slightly; the leg doesn't just go straight down. The muslces on the lower leg, especially the calves, should protrude a little. Here are some more poses. I didn't use the prelimiary ovals this time because I forgot, but you should be able to see the oval shapes of the various parts of the legs. Again, I would like to bring attention to the knee, especially in the lower pictures. When the leg is ent, the knee can be drawn like a flat plane. I shaded these legs to help give you a better idea of their form. There are better details on this in various figure drawing books, but since you don't often see every bone and muscle on an anime character, I didn't feel the need to go over everything. The calves obscure part of the thigh. The lower part of the legs that are liftedup are not visible, since they are hidden behind the rest of the leg. Well, just as its important to be able to draw someonefrom the front, you may also wish to draw them from behind. In which case, it helps to know how to actually draw someone's behind. I wasn't going to add this, but since many anime girls are draw in skin tight suits or swimsuits, it's kind of important. Just be careful how you make the legs connect to the rest of the body. There's more info in the next section of this tutorial.
All right, now that we've gone over the major areas in detail, lets put them all together and make a full body pose. When drawing your subject, you can either begin with the prelimiary ovals and circles, or you can go straight to the final draft, whichever you are most comforable with. If you are using circles and ovals, then you will notice that the main body (torso and pelvis) are composed of two basic shapes, both of which curve inwards towards the stomach. I'm not going to go over thesea lot, because they have been well documented in other figure drawing tutorials. Make sure that both of these shapes, as well as the head, are aligned along a central guidline (as shown). This guidline is pretty much the spine of the character, and will determine the pose she is going to be in. Notice here that the center line curves to the left a little on the pelvis; this is because her weight is shifted and her left hip sticks out slightly (which makes the pose a little more interesting than if her weight is evenly balanced). The body can be equally divided in half as shown to by the red guidlines. You can use that as a general reference when determing how long the legs should be in proportion to the rest of the body, but often times in anime the length of the legs is exaggerated, for both males and females, and it looks just fine. When drawing the midsection, remember to try to keep the hourglass figure shape. Female anime characters will generally have thin shoulders, a thin stomach, and a somewhat round waist. Be careful to make the curves look natural, unless you are really good at figure drawing and can exaggerate the proportions. I have found side views to be difficult, since I had a hard time finding decent reference pictures. Notice that the body is composed of the same basic shapes, except the shapes have been rotated around. One of the things you need to consider when drawing from this angle is the shape of the upper torso. As you come straight down from the neck, the chest will stick out slightly at a sharp angle as you come to the collarbone. After that point, the torso is drawn at a smooth diagonal until you reach the hemisphere shape of the breasts (remember that they are half spheres; don't draw them like beach balls!) Beneath that, the torso continues to protrude outwards slightly until reach the bottom of what would be the ribcage (its a little over one headlength down from the shoulders). After the ribcage, curve back inwards a little for the stomach. Other things to look out for are the shape of the legs (the thighs round out in front, and are flatter in back, while the lower legs are just the opposite) and the subject's behind (make sure you don't exaggerate it too much).
For the final pose of this tutorial you may actually need to draw at one point from behind. Just as before, the subject can be equally divided in half. Things to look out for at this angle include the neck; it connects up into the skull, and shouldobscure part of the face. The midsection should be somewhat hourglass shaped, but again, don't overexaggerate the curve unless you really know your anatomy (you have to know the basics before you can start bending the rules). Don't overdefinethe lines on the behind, since there's little reason too. Be careful when drawing the arms; from the back, the elbows should be more prominent than usual. Check out the section on arms for more information. That concludes the female figure drawingtutorial. I hope this gives you an understanding of basic anatomy, and helps you out when drawing full body.
Blog Widget by LinkWithin