Search This Blog

Showing posts with label drawing. Show all posts

THE FIVE P’S

This is how you can make your drawings and sketch perfect!

Proportion, Placement, Perspective, Planes, Pattern

Here we go..........................!

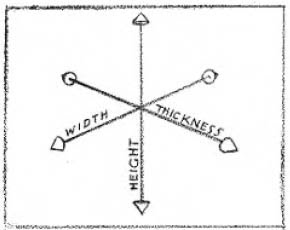
1. PROPORTION

The three dimensions
2. PLACEMENT

A position in space

3. PERSPECTIVE

Relationship of viewpoint to subject

4. PLANES

Surface appearance as defined by light and shadow.

5. PATTERN

The deliberate arrangement of the tones of the subjects
See also Five C's

How to Draw Prospective View? part III

Here comes the 3rd and last part for drawing prospective view...........


Enjoy............!

Note: please collect all images and re-arange them in sequence of "draw comic_pros1, draw comic_pros2 ...................................................... draw comic_pros10"

waiting for your beedback
profesor AZii
Art Lover


How to Draw Prospective View? part II

Here is Part II of how to draw prospective view


Enjoy.............!


How to Draw Prospective View? part I

I am sharing this tutorial so that you can be able to draw so sketches with prospective view.
here we go...........


Enjoy....................!

Drawing The Eye: Three Quarter View

Step1: When the head turns from a front view to a three quarter view, the eye turns too, of course, and its shape changes. If the sitter is looking straight at you, the iris moves to the side, as you see here. Once again, the artist begins with quick, casual lines. He draws the main contours of the eyelids. Iris, and eyebrow, with a slight suggestion of the eye socket along the side of the nose. Have you noticed the straight, horizontal line that crosses the eye? That’s the guideline that the artist has drawn across the egg-shaped head to locate the eyes.


Step 2: The artist goes over the lines of step1 with darker, more precise lines. The curves of the eyelids are define more carefully, the disc shape of the iris is drawn more precisely, and the pupil is added. In the three-quarter view, the eye doesn’t seem quite as wide as it does in the front view. But the curving shapes of the lids are essentially the same. From the outer corner, the top lid begins as a long, flattened curve and then turns steeply downward at the inside corner. Conversely, the lover lid starts from the inside corner as a long, flattened curve and then turns sharply upward at the outside corner.

Step 3: The artist begins to suggest the distribution of tones with clusters of parallel strokes. These broad strokes are made with the side of the pencil lead, rather that with the sharp tip. Notice how the strokes tend to curve around the contours of the eye sockets. The shadowy edges of the lids are drawn carefully. Once again, the artist indicates the shadow that’s cast across the eye by the upper lid. The pupil is darkened. The eyebrow is darkened slightly, but the strongest darks are saved for the final step.


Step 4: The artist blackens the pupil, darkens the iris, and strengthens the shadowy edges of the eyelids. More groups of parallel strokes made by the side of the lead—curve around the eye socket to darken the tones and make its shape look rounder. On the white of the eye, a touch of shadow is added at the corner. Long, graceful lines suggest the hairs of the eyebrow, while short, curving lines suggest eyelashes. And eraser picks out highlights on the pupil. Compare the soft, rounded character of this female eye with the more angular male eye on the preceding page.

Drawing Of Human Eye: Front View

Step1. Begin to draw the eye by indicating its basic contuouirs with a few casual but carefully palced lines. The complete upper and lower lids, as well as the eyebrow and the corner of the eye socket at the side of the nose. At this stage the iris is just a circle. Study the contours of the inner edges of the lids. Starting from the outer corner, the top lid follows a long, flattened curve and turns down a bit at hte inside corner. The lower lid does just the opposite, starting from the inside corner as a long, flattened curve and then turning upward at the outside corner.

Step 2.Pressing harder on the point of your pencil, now move back over the casual guidelines of Step 1 to refine the contours. The rather angular lines of Step 1 become rounder and more rhythmic. They eye begins to look more lifelike. The shapes of the lids are more clearly defined. It's particularly important to remember that the upper lid always overlaps the iris, cutting off part of the circle. The lower lid touches the iris but doesn't overlap it quite so much.


Step 3.Having drawn the contours more accurately, the artist now begins to block in the tones with broad, spontaneous strokes. The tones are actually clusters of parallel strokes, which you can see most clearly in the tone of the iris and the shadow inside the eye socket. The suggestion is the dark spot of the pupil, and one should carefully draw the shadow that the upper lid casts across the iris and over the white of the eye. Drawing indicates the shadows at the corners of the lids and on hte underside of the lower lid.

Step 4.In the final stage, the artist should strengthen his/her tones and adds the final details he/she darkens the shadowy lines around the eyelids and deepens the shadow cast over the eyes by the upper lid. He/She can darken the iris and the pupil, picking out the highlight on the iris with a quick touch of an eraser. More clusters of parallel lines darken the corner of hte eye socket alongside the nose. Scribbly, erratic lines suggest the eyebrow. And using the sharp point of pencil, he/she should carefully retrace the contours of theupper lid and the tear ducts at the coner of the eye.

Blog Widget by LinkWithin