Search This Blog

Showing posts with label path. Show all posts

About paths, Illustrator

A path is made up of one or more straight or curved segments. The beginning and end of each segment is marked by anchor points, which work like pins holding wire in place. You change the shape of a path by editing its anchor points. You can control curves by dragging the direction points at the end of direction lines that appear at anchor points. A path is either open, like an arc, or closed, like a circle. For an open path, the starting and ending anchor points for the path are called endpoints.
Components of a path

A. Selected (solid) endpoint B. Selected anchor point C. Curved path segment D. Direction
line E. Direction point


Paths can have two kinds of anchor points—corner points and smooth points. At a corner point, a path abruptly changes direction. At a smooth point, path segments are connected as a continuous curve. You can draw a path using any combination of corner and smooth points. If you draw the wrong kind of point, you can always change it.
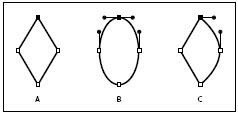
Points on a path
A. Four corner points B. Four smooth points C. Combination of corner and smooth points

A corner point can connect any two straight or curved segments, while a smooth point always connects two curved segments.
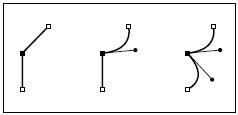
A corner point can connect both straight segments and curved segments.

Changing a tool pointer
You can change the appearance of the pointer from the tool pointer to a cross hair for more precise control. When the pointer is a cross hair, more of your artwork is visible. This is convenient when you’re doing detailed drawing and editing.
To make a drawing tool pointer appear as a cross hair:
Do one of the following:
• Choose Edit > Preferences > General (Windows and Mac OS 9) or Illustrator > Preferences > General (Mac OS X). Select Use Precise Cursors, and click OK.
• Press Caps Lock before you begin drawing with the tool.

InDesign: How to Type on a Path?

Q: How to Type on a Path?

A:
Not only can text be set in frames of any shape, it can also be set around frames of any shape, on any open or closed path. Figure below shows a few different examples of type on a path. The concept of Type on a Path isn’t new—illustration applications and many page layout programs have had the ability for decades now. InDesign does it as well as any other application, and it has a few features you might be surprised to see in a page layout application.

Setting Type on a Path
Let’s start with a little hands-on.
1. With the Pen tool, draw a meandering open path. I’m going to use a gentle S curve see Figure , but any shape will do.
2. On the Tools panel, click and hold on the Type tool to reveal the Type on a Path tool behind it. The Type on a Path tool looks rather like a T sliding down a log flume ride.
3. Position the Type on a Path tool cursor near the beginning of the path. When you’re close enough, a little plus sign will appear in the upper-right quadrant of the cursor. Click.
4. You should now see a flashing I-beam cursor on the path itself. Type something and watch as your type follows the flow of the path (see Figure).
One of the differences between the way InDesign and other applications do type on a path is the fact that InDesign does not automatically strip the fill or stroke colour from the path. Notice the line stroke is still visible. This can be a good thing or a bad thing. To hide the path stroke, just remove it on the Swatches panel.

Editing Type on a Path
The text in the type on a path object is just standard text. You can style it however you like, including applying paragraph and character styles. Spell check, Find/Change, Autocorrect, and all the other text features of InDesign work on, and apply equally to, text in type on a path objects as framed type. They can even contain (or be) anchored objects. If your typing went too far, placing more text than will fit on the path, the text will overset just like a text frame. You can see in Figure
the little red plus sign indicating overset text after I increased the size of the type but not the size of the path on which it rides. The overset indicator appears in the outport of the type on a path object. If you look toward the other end of the path, you’ll also see a matching inport. Yes, you can thread multiple type on a path objects together, running text from one to the other just like you can with text frames. You can change text alignment by using the alignment buttons on the Paragraph panel (left, right, center, justified, and so on). On the same panel, the left and right paragraph indentation fields are also available, enabling you to build some padding into the beginning or end of the path. Alignment occurs within the total length of the path less any indentations you’ve set. There’s another way to control the indentation of type on a path, which, conveniently, is similar to the way you alter the center point and flip type from the top to the bottom of the path and vice versa.

Type on a path objects have three special indicators
---the start point,
---the center point,
---the end point indicators.
With the black arrow Selection tool, select the type on a path object and position the cursor over any of the three indicators. When you’re close enough, the cursor will change to the one in Figure.
Once you see that, click and drag the indicator. Dragging the start or end point indicators inward will create padding on that end, enabling the path to continue but limiting the text to the position of the indicator. The center point indicator can go either way and will alter the horizontal center of the line of text. It can also flip text from one side of the path to the other—just drag the center point indicator across the path and the text will follow. Note that the text changes direction as well; if you just want to push the text below the path without changing direction, use the Align and To Path fields in Type on a Path Options. See Figure.
The path remains completely editable at all times, incidentally. Just grab the Direct Selection or any other path editing tool and change the path shape; the text will reflow to follow. If you’ve changed your mind and want to remove type from the path, that’s easy. To keep the type, select it with the Type or Type on a Path tool and cut; paste the text elsewhere. If you’d also (or instead) like to preserve the path without text, select the type on a path object and choose
Type >Type on a Path >Delete Type from Path.

InDesign: What is Compound Paths and How to handle them?

Q: What is Compound Paths and How to handle them?

A:
Compound Paths
Any time a Pathfinder command results in a shape that is more than a single, continuous path, you get what’s called a compound path. Although compound shape is merely a descriptive term for a shape that is more complex than a rectangle, ellipse, or polygon and, in the grand scheme of things, hasn’t much of a meaning, compound path is a more important term because it refers to a certain type of path. A compound path is a new, more complex type of path with different considerations than those for a simple, continuous path. It’s multiple separate paths behaving as one.

Here we start to learn

1. Draw a perfect circle (you know two ways to do that quickly), and fill it with a solid color but without a stroke.

2. Atop the circle, create a five-pointed star that is larger than the circle (see Figure A), and give it, too, a solid color fill and no stroke color.

3. Select both the star and circle and go to Object >Pathfinder >Exclude Overlap. Your result should be similar to mine (Figure B), with the overlapping area knocked out and the resulting shape acquiring the star’s fill and stroke attributes. Look closely at this new object. If you select it with the Direct Selection tool, you’ll notice all the anchor points throughout. There’s no way that object is a single continuous path. It can’t be—it has 10 different filled areas, 10 different closed paths. That, ladies, and gentlemen, is a compound path— multiple paths behaving as one.

Try changing the object’s fill color—all areas will change simultaneously. In many cases, you’ll find that’s the desired result. When it isn’t, when you want to separately color the shapes in this compound path, remember this crucial piece of information.

4. Although this will work however you’ve selected the compound path, let’s keep it selected with the Direct Selection tool so we can more closely observe the changes to the object as we…choose Object >Paths >Release Compound Path. Do you see the difference? It’s subtle. Undo the last command and look at your compound path star. Where’s the object center point? Right: In the center of the star. Now press Cmd+Shift+Z/Ctrl+Shift+Z to redo the release compound path command. Where is the center point now? Uh-huh. That’s right: There isn’t 1 but 10. All the shapes have been released to individual paths, with their own centers and their own independent paths. They can even be moved or edited independently if you wanted to do that (but not now).

5. Deselect all, then select one of the star points. Give it a fill color. Good. Now give the next star point a different color. Keep going until you’ve filled all five. (Figure C) shows how my star looks so far (it also shows the center points and paths, in case you need to see them).

6. For this particular project, we don’t want all the star points to be different colors, though. We want them the same color. In fact, we want the remaining circle sections to also match each other, but not with a solid color fill; we want them to have a radial gradient (see Figure D). See what you can do to match your circle sections to mine.

No luck on getting the circle parts to fill with a radial gradient like mine in (Figure D) Let me guess: You got a separate radial gradient in all five sections, didn’t you? That’s because we haven’t done step 7 yet.

7. Applying a gradient, object effects, and a few other things to multiple paths applies a new instance to each path. To get the desired effect for this project, we can’t have separate paths. We need a compound path—but only of the circle pieces, not the star points, too, or we’ll end up back at the same problem we faced in step 3. Select all five sections of the circle together and go to Object >Paths >Make Compound Path. Now we’ve turned these separate paths back into a compound path, which means they’ll once again behave as if they were one path. Try giving it a radial gradient fill now. Better results, right?

Go ahead and deselect the circle parts compound path and select the individual star point paths. Make a compound path of them as well, just for efficiency and expediency. Now assign their fill color; I went with a solid red, but you’re free to use any color or even another gradient if you like.

What else can you do with compound paths? You can use them as containers for placed images. Select your circle sections compound path, choose File >Place, and import a photo. It will place right into the compound path. Think about the possibilities that opens up for creative image frame shapes and vector elements. Compound paths can also hold text, although the shapes we have with this star would be better suited to containing decorative text rather than copy you expect to be read. Click in it with the Text tool and start typing to see what I mean. Of course, being a container, a compound path can hold other containers. Experiment and you’ll find some really interesting ideas!

Waiting for your feedback…..

Profesor AZii
Blog Widget by LinkWithin