Continue from Part III
Reusable Document Setups
This section is about efficiency. As I’ve said before, if you’ll do something more than once, do it only once and automate it. InDesign has numerous automation-enabling facilities for many common tasks, including reusable page setups.
 Document Presets
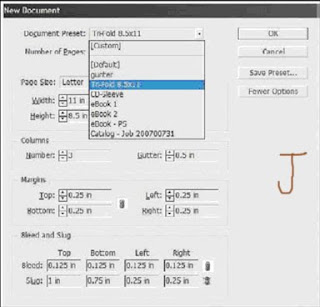
At the top of the New Document dialog (File >New >Document) is the Document Preset dropdown menu (see Figure J). By default, it contains only [Default] and [Custom]. The latter is intended just to be a visual cue for you the InDesign user. Change anything below and the preset becomes [Custom]; you do not need to preselect [Custom] in order to make any changes below it.
This section is about efficiency. As I’ve said before, if you’ll do something more than once, do it only once and automate it. InDesign has numerous automation-enabling facilities for many common tasks, including reusable page setups.
 Document Presets
At the top of the New Document dialog (File >New >Document) is the Document Preset dropdown menu (see Figure J). By default, it contains only [Default] and [Custom]. The latter is intended just to be a visual cue for you the InDesign user. Change anything below and the preset becomes [Custom]; you do not need to preselect [Custom] in order to make any changes below it.
If you more often than not have to change something from its default in the New Document dialog,—maybe your typical document is tabloid sized, includes a standard-sized bleed, has multiple columns, or needs something other than a half inch all around margin—set it up just once and build a preset. Every subsequent document you create will then not require all the manual settings; you’ll be able to select it from the Document Preset menu and have all your options applied. Just set the options once, click the Save Preset button, and give the preset a name in the Save Preset dialog that pops up. Upon clicking OK, you’ll find your customer preset below [Default] in the list, ready for two-click setup of your next document. Build presets for all the different types of documents you create at least once in a while.
Page Size Presets
Hey! Is there a way to customize the Paper Size menu? Another common question, and the answer is yes. The Page Size list contains the most common paper sizes customers told Adobe they use. If they aren’t inclusive of your most common page sizes, tell Adobe; maybe a future edition of InDesign will include your typical page sizes. Until then, you can manually override them by changing the width, height, and/or orientation below the drop-down menu, or you can add your own common sizes to the Page Sizes list. Here’s how:
1. Quit out of InDesign.
2. Open this file in your text editor:
Windows: Program Files\Adobe\Adobe InDesign CS3\Presets\New Doc Sizes.txt
Mac OS: Applications/Adobe InDesign CS3/Presets/New Doc Sizes.txt
3. At the bottom of the file, insert each of your desired page size presets in the following format:
Name[tab]Width[tab]Height. Here’s an example:
Business Card 3.5” 2”
4. Save and close New Doc Sizes.txt. When you open InDesign next, your new options will be in the Page Sizes list. There are other examples in the New Doc Sizes.txt file right above the copyright notice. Remove the semicolons and leading spaces to uncomment the examples and make them selectable page sizes for new documents. The rest of the file contains additional instructions and information you may find useful.
Page Size Presets
Hey! Is there a way to customize the Paper Size menu? Another common question, and the answer is yes. The Page Size list contains the most common paper sizes customers told Adobe they use. If they aren’t inclusive of your most common page sizes, tell Adobe; maybe a future edition of InDesign will include your typical page sizes. Until then, you can manually override them by changing the width, height, and/or orientation below the drop-down menu, or you can add your own common sizes to the Page Sizes list. Here’s how:
1. Quit out of InDesign.
2. Open this file in your text editor:
Windows: Program Files\Adobe\Adobe InDesign CS3\Presets\New Doc Sizes.txt
Mac OS: Applications/Adobe InDesign CS3/Presets/New Doc Sizes.txt
3. At the bottom of the file, insert each of your desired page size presets in the following format:
Name[tab]Width[tab]Height. Here’s an example:
Business Card 3.5” 2”
4. Save and close New Doc Sizes.txt. When you open InDesign next, your new options will be in the Page Sizes list. There are other examples in the New Doc Sizes.txt file right above the copyright notice. Remove the semicolons and leading spaces to uncomment the examples and make them selectable page sizes for new documents. The rest of the file contains additional instructions and information you may find useful.
If your custom addition didn’t work, check that you inserted straight inch marks (") instead of curly quote marks (”). If you’re having trouble getting the inch marks (even some text editors do automatic correction now) use i or in in their stead.
Document Templates
Neither document presets nor page size presets can save your manually created live area guides, but a template can. In fact, a template can save everything to do with a particular document—paragraph, character, table, cell, and object styles as well as swatches, dictionary spelling and hyphenation exceptions, columns, and master pages, among other things. I always recommend templates for workflows that frequently employ the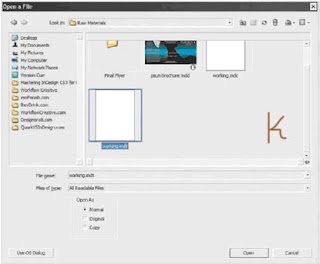 same or similar document layouts and styles. Cumulatively, templates can save a massive amount of time over setting up documents manually, and they can be passed around the office or posted on a shared server for simultaneous use by everyone. Templates, in fact, are the key to consistent style usage among workgroups (more on that in Chapter 11, “Efficiency”). If you’ve set up trim area guides or any other document feature likely to be reused on the same page size in the future, save it as a template. Just go to File >Save As, and change the Save As Type drop-down to InDesign CS3 Template. The resulting file will have an .indt extension instead of .indd and will have a slightly different icon. For all intents and purposes, it’s just a standard InDesign document with the sole exception that the .indt extension triggers a slightly different behavior when File >Open is used. Instead of opening the template itself, InDesign will create a new, untitled document based on that template—a duplicate—and will not open the template itself. In the new document you’ll have everything you had in the template—paragraph, character, table, cell, and object styles as well as swatches, dictionary spelling and hyphenation exceptions, columns, and master pages, among other things. The trick is in the way the Open dialog works. Note the three Open As options at the bottom (see Figure K). Original opens the original file, whether an InDesign document, template, or Interchange Format INX file. Copy generates on-the-fly an unsaved duplicate of the selected document; the original is left untouched, but InDesign creates a new document faithful to the original in every respect. Finally, Normal says to use whatever is default behavior for the specific document type—INDD and INX documents open originals, INDTs create copies. Normal is the default, which means that, when designers in your workgroup need to create new documents from your template, they won’t be editing the template itself. To do that, you must deliberately choose to open the original. Note that when you’re opening documents created in a previous version of InDesign or created in a compatible version of PageMaker (6.0–7.0) or QuarkXPress (3.3–4.1 and QuarkXPress Passport 4.1), a copy will be created regardless of the Open As choice. A template-based workflow is the ideal for any periodical and is usually more efficient and leads to fewer content-destroying mistakes than opening the previous issue’s files, resaving as the next issue’s files, and then replacing content. I’ve seen few other workflows wherein at least one document setup is reused that doesn’t also see a benefit from employing templates.
Document Templates
Neither document presets nor page size presets can save your manually created live area guides, but a template can. In fact, a template can save everything to do with a particular document—paragraph, character, table, cell, and object styles as well as swatches, dictionary spelling and hyphenation exceptions, columns, and master pages, among other things. I always recommend templates for workflows that frequently employ the
 same or similar document layouts and styles. Cumulatively, templates can save a massive amount of time over setting up documents manually, and they can be passed around the office or posted on a shared server for simultaneous use by everyone. Templates, in fact, are the key to consistent style usage among workgroups (more on that in Chapter 11, “Efficiency”). If you’ve set up trim area guides or any other document feature likely to be reused on the same page size in the future, save it as a template. Just go to File >Save As, and change the Save As Type drop-down to InDesign CS3 Template. The resulting file will have an .indt extension instead of .indd and will have a slightly different icon. For all intents and purposes, it’s just a standard InDesign document with the sole exception that the .indt extension triggers a slightly different behavior when File >Open is used. Instead of opening the template itself, InDesign will create a new, untitled document based on that template—a duplicate—and will not open the template itself. In the new document you’ll have everything you had in the template—paragraph, character, table, cell, and object styles as well as swatches, dictionary spelling and hyphenation exceptions, columns, and master pages, among other things. The trick is in the way the Open dialog works. Note the three Open As options at the bottom (see Figure K). Original opens the original file, whether an InDesign document, template, or Interchange Format INX file. Copy generates on-the-fly an unsaved duplicate of the selected document; the original is left untouched, but InDesign creates a new document faithful to the original in every respect. Finally, Normal says to use whatever is default behavior for the specific document type—INDD and INX documents open originals, INDTs create copies. Normal is the default, which means that, when designers in your workgroup need to create new documents from your template, they won’t be editing the template itself. To do that, you must deliberately choose to open the original. Note that when you’re opening documents created in a previous version of InDesign or created in a compatible version of PageMaker (6.0–7.0) or QuarkXPress (3.3–4.1 and QuarkXPress Passport 4.1), a copy will be created regardless of the Open As choice. A template-based workflow is the ideal for any periodical and is usually more efficient and leads to fewer content-destroying mistakes than opening the previous issue’s files, resaving as the next issue’s files, and then replacing content. I’ve seen few other workflows wherein at least one document setup is reused that doesn’t also see a benefit from employing templates.
If you choose the File >New >Document from Template command, it opens an Adobe Bridge window focused on the Templates\InDesign folder created during InDesign or Creative Suite install. Dozens of professionally designed, royalty-free templates are included with InDesign CS3, and you can use them as is or, better, as learning aids. They’re all InDesign template INDT files, so opening them by double-clicking in the Bridge view will have the same effect as opening a template you created using the default Normal option—a new, untitled document based on the template.
 Layout Adjustment
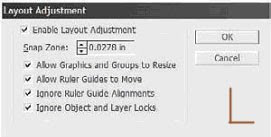
This isn’t strictly a master page thing, but layout adjustment is most often used in conjunction with master pages, so it makes the most sense to bring it up here.After initially creating the document, you can change its type—facing or nonfacing—as well as the paper size and orientation with File >Document Setup. Using Layout >Margins and Columns, you can also alter the margins, number of columns, and column gutter width. Finally, on master pages, margin guides can be manually dragged to new positions (if unlocked). None of these changes will adapt your page objects to the new conditions by default. If you want your text frames to expand or contract to fit new margins, to automatically reduce or increase the number of columns they contain according to changes you’ve made in Margins and Columns, or if you want other objects to adjust to the new document layout without you having to do it all by hand, turn to Layout Adjustment on the Layout menu (see Figure L).
 Layout Adjustment
This isn’t strictly a master page thing, but layout adjustment is most often used in conjunction with master pages, so it makes the most sense to bring it up here.After initially creating the document, you can change its type—facing or nonfacing—as well as the paper size and orientation with File >Document Setup. Using Layout >Margins and Columns, you can also alter the margins, number of columns, and column gutter width. Finally, on master pages, margin guides can be manually dragged to new positions (if unlocked). None of these changes will adapt your page objects to the new conditions by default. If you want your text frames to expand or contract to fit new margins, to automatically reduce or increase the number of columns they contain according to changes you’ve made in Margins and Columns, or if you want other objects to adjust to the new document layout without you having to do it all by hand, turn to Layout Adjustment on the Layout menu (see Figure L).
Layout Adjustment does a decent job of reformatting page (and master page) objects to conform to new document conditions such as new page sizes and orientations and margin and column guide relocation. Frames will be moved and resized as needed to adapt to the new layout if Enable Layout Adjustment is activated prior to making the layout change. Here is what the options mean:
Snap Zone The maximum distance an object must be from one or more margin or column guides or the page edge to be a candidate for repositioning or resizing with Layout Adjustment. For instance, with a value of 0.25 inches, a master text frame directly on four margins will be adjusted but a graphic frame 0.5 inches from the nearest guide will not be adjusted.
Allow Graphics and Groups to Resize Vector objects, frames, and groups of objects will be repositioned by Layout Adjustment regardless of whether they fall within the snap zone. This option determines whether they may also be scaled to better fit. For instance, if converting an 8.5x11-inch document from portrait to landscape, should a full-page background graphic frame follow suit to become 11x8.5 inches with its content scaled accordingly?
Allow Ruler Guides to Move Manually created ruler guides—column center points, for example—can be moved to maintain their relative position to margin and column guides with this option checked.
Ignore Ruler Guide Alignments Throughout working on a document, we often create numerous ruler guides that are not significantly related to the layout. Because layout adjustment considers all guides in its calculations, these nonessential guides can cause it confusion, leading to improperly adjusted layouts. Checking this option tells InDesign to ignore them, factoring in only page edges and column and margin guides when repositioning and scaling objects.
Ignore Object and Layer Locks This option is an easier alternative to unlocking locked layers and combing through a document looking for any objects whose positions have been selectively locked. Enabling this will reposition and/or scale objects regardless of their individual or layer lock statuses.
Snap Zone The maximum distance an object must be from one or more margin or column guides or the page edge to be a candidate for repositioning or resizing with Layout Adjustment. For instance, with a value of 0.25 inches, a master text frame directly on four margins will be adjusted but a graphic frame 0.5 inches from the nearest guide will not be adjusted.
Allow Graphics and Groups to Resize Vector objects, frames, and groups of objects will be repositioned by Layout Adjustment regardless of whether they fall within the snap zone. This option determines whether they may also be scaled to better fit. For instance, if converting an 8.5x11-inch document from portrait to landscape, should a full-page background graphic frame follow suit to become 11x8.5 inches with its content scaled accordingly?
Allow Ruler Guides to Move Manually created ruler guides—column center points, for example—can be moved to maintain their relative position to margin and column guides with this option checked.
Ignore Ruler Guide Alignments Throughout working on a document, we often create numerous ruler guides that are not significantly related to the layout. Because layout adjustment considers all guides in its calculations, these nonessential guides can cause it confusion, leading to improperly adjusted layouts. Checking this option tells InDesign to ignore them, factoring in only page edges and column and margin guides when repositioning and scaling objects.
Ignore Object and Layer Locks This option is an easier alternative to unlocking locked layers and combing through a document looking for any objects whose positions have been selectively locked. Enabling this will reposition and/or scale objects regardless of their individual or layer lock statuses.
Multiple Page Sizes
Since long before computers, there has always been a need to create documents that include multiple page sizes or orientations. With the rise of VDP and digital-to-press output making high-quality, one-off productions an affordable option, multiple page sizes and orientations in documents have become more common and more desirable. But the software has never caught up with the need— even in the cutting edge of page production, InDesign CS3. QuarkXPress, since version 6.0, has done multiple page sizes in one “project,” but it’s not truly the same thing. You see, QuarkXPress merely allows multiple, disconnected layouts to be saved in the same file—it’s an MDF, a multiple document format, similar to the way Excel allows multiple spreadsheets to be saved in a single Excel document. QuarkXPress, even in the latest version as of this writing, still won’t allow two or more differently sized pages in a single, continuous layout. In close to a hundred InDesign training, consulting, and speaking engagements, I’m hard-pressed to recall a single one in which I wasn’t asked if InDesign could do multiple page sizes in one document. There’s a lot of need for that feature in our field. Gatefold covers and ads in magazines are still produced separately from surrounding pages and then inserted at bindery time. Maps, charts, and spreadsheets in proposals and technical books are still separate InDesign documents. Landscape content in a portrait-orientation book still forces designers to work sideways, either trying to read at 90 degrees or rotating their work for every change or onscreen copy proof—and that often requires grouping and ungrouping for many edits just to retain object relational positions. Frankly, it’s ridiculous. That’s why I did something about it.
First, let’s look at the workaround we—design, prepress, press professionals—have come to accept as the “only” way of creating multiple page sizes or orientations in a single document.
Book Panel
InDesign only allows a single page orientation and size per document. If most of the document is to be 8.5x11 inches portrait (tall), then it’s all going to be 8.5x11 inches portrait. The workaround to this limitation has been “booking” multiple documents together to (somewhat) behave as one. This isn’t just InDesign, by the way. Print pros have been using this same workaround for two decades in QuarkXPress, PageMaker, and other layout applications. We’ll look at the functionality of InDesign Book documents and the Book panel in Chapter 9, “Documents,” but in essence, an InDesign Book document (INDB) is a paperclip that links multiple, otherwise completely self-contained InDesign documents together. Via the Book panel, page and section numbers, styles, indexes, and tables of contents can be synchronized among all the booked files. They can also be preflighted, packaged, exported to PDF, and printed simultaneously as if they were a single document. That is very cool and powerful, as are the synchronizing functions. The Book panel, though, was developed for the purpose of managing longer documents. It enables, for instance, this book to be written in chapters. As I’m writing this chapter, others are with my editors Sam and Karen, some are already with the compositor being poured into the layout template, and still other chapters are on their way back to me for final layout proof. When all the chapters are done, the fact that they’re booked will keep page numbers, the TOC, and the index correct, ensuring that Chapter 2 begins numbering where Chapter 1 leaves off and so on. Because the Book panel has all these features, it can be used to insert an oversized or rotated page into the middle of a long document. For instance, if page 26 is a fold-out tabloid diagram among 47 other 8.5x11-inch pages, the Book panel can insert the tabloid as page 26 and keep the rest of the page numbers in synch. The catch is that they must all be separate documents. Pages 1 through 25 must be one 8.5x11-inch InDesign document, page 26 a single 11x17-inch page document, and then pages 27 through 48 have to be a third document because they’re 8.5x11 inches. If editorial says the tabloid diagram belongs two pages previous, you’ll have to pull two pages out of the first document and insert them in the third to make it work. Of course, that’s only the simplest of scenarios. Many longer documents have several charts, diagrams, fold-outs, or other oversized pages. Everywhere that the page size differs requires a new InDesign document. Beginning to see how this can get ugly? Add in the fact that each of those documents has its own localized paragraph, character, object, table, and cell styles as well as hyphenation exceptions, swatches, ink settings, master pages, and a whole lot more and every document exponentially increases the risk of mistakes making it to press. All of these can be synchronized via the Book panel, but that must be done deliberately and correctly. Someone forgets or doesn’t synch correctly, and…. Well, I’m sure you can imagine—or maybe you don’t have to imagine. If you need to deal with two or three different booked documents as a result of page size or orientation differences only once in a while, use the Book panel method. If you need it more often, or just don’t want to add another layer of complication to your workflow, there’s another option.
Page Control Plug-InUntil November 2006, the Book panel option was the only workaround to managing multiple page sizes or orientations in a single document created in InDesign. Then DTP Tools and I released the Page Control plug-in, which works in InDesign CS, CS2, and CS3. With it, you can resize any or all pages—singly or in spreads—change from landscape to portrait, change the vertical alignment of pages within a spread, resize master pages, set document pages to automatically resize according to their assigned masters, and change the size of the pasteboard for more working room—and all of this in one, single InDesign document that can be packaged, printed, exported to PDF, and so on without risky or inconvenient workarounds (see Figure M). And, it prints. Prior to releasing Page Control, we held a public beta period in which we asked printers in the U.S., Australia, and Europe, among other places and groups of professionals, to test it out thoroughly. Whether printed natively from InDesign, printed from an InDesign-exported PDF, or printed first to PostScript, documents containing a full range of different page sizes sailed through RIPs without complaint. As of this writing, Page Control has been available and selling to design and prepress professionals all over the world for several months; I have yet to hear a complaint from anywhere within the for-print process.
Since long before computers, there has always been a need to create documents that include multiple page sizes or orientations. With the rise of VDP and digital-to-press output making high-quality, one-off productions an affordable option, multiple page sizes and orientations in documents have become more common and more desirable. But the software has never caught up with the need— even in the cutting edge of page production, InDesign CS3. QuarkXPress, since version 6.0, has done multiple page sizes in one “project,” but it’s not truly the same thing. You see, QuarkXPress merely allows multiple, disconnected layouts to be saved in the same file—it’s an MDF, a multiple document format, similar to the way Excel allows multiple spreadsheets to be saved in a single Excel document. QuarkXPress, even in the latest version as of this writing, still won’t allow two or more differently sized pages in a single, continuous layout. In close to a hundred InDesign training, consulting, and speaking engagements, I’m hard-pressed to recall a single one in which I wasn’t asked if InDesign could do multiple page sizes in one document. There’s a lot of need for that feature in our field. Gatefold covers and ads in magazines are still produced separately from surrounding pages and then inserted at bindery time. Maps, charts, and spreadsheets in proposals and technical books are still separate InDesign documents. Landscape content in a portrait-orientation book still forces designers to work sideways, either trying to read at 90 degrees or rotating their work for every change or onscreen copy proof—and that often requires grouping and ungrouping for many edits just to retain object relational positions. Frankly, it’s ridiculous. That’s why I did something about it.
First, let’s look at the workaround we—design, prepress, press professionals—have come to accept as the “only” way of creating multiple page sizes or orientations in a single document.
Book Panel
InDesign only allows a single page orientation and size per document. If most of the document is to be 8.5x11 inches portrait (tall), then it’s all going to be 8.5x11 inches portrait. The workaround to this limitation has been “booking” multiple documents together to (somewhat) behave as one. This isn’t just InDesign, by the way. Print pros have been using this same workaround for two decades in QuarkXPress, PageMaker, and other layout applications. We’ll look at the functionality of InDesign Book documents and the Book panel in Chapter 9, “Documents,” but in essence, an InDesign Book document (INDB) is a paperclip that links multiple, otherwise completely self-contained InDesign documents together. Via the Book panel, page and section numbers, styles, indexes, and tables of contents can be synchronized among all the booked files. They can also be preflighted, packaged, exported to PDF, and printed simultaneously as if they were a single document. That is very cool and powerful, as are the synchronizing functions. The Book panel, though, was developed for the purpose of managing longer documents. It enables, for instance, this book to be written in chapters. As I’m writing this chapter, others are with my editors Sam and Karen, some are already with the compositor being poured into the layout template, and still other chapters are on their way back to me for final layout proof. When all the chapters are done, the fact that they’re booked will keep page numbers, the TOC, and the index correct, ensuring that Chapter 2 begins numbering where Chapter 1 leaves off and so on. Because the Book panel has all these features, it can be used to insert an oversized or rotated page into the middle of a long document. For instance, if page 26 is a fold-out tabloid diagram among 47 other 8.5x11-inch pages, the Book panel can insert the tabloid as page 26 and keep the rest of the page numbers in synch. The catch is that they must all be separate documents. Pages 1 through 25 must be one 8.5x11-inch InDesign document, page 26 a single 11x17-inch page document, and then pages 27 through 48 have to be a third document because they’re 8.5x11 inches. If editorial says the tabloid diagram belongs two pages previous, you’ll have to pull two pages out of the first document and insert them in the third to make it work. Of course, that’s only the simplest of scenarios. Many longer documents have several charts, diagrams, fold-outs, or other oversized pages. Everywhere that the page size differs requires a new InDesign document. Beginning to see how this can get ugly? Add in the fact that each of those documents has its own localized paragraph, character, object, table, and cell styles as well as hyphenation exceptions, swatches, ink settings, master pages, and a whole lot more and every document exponentially increases the risk of mistakes making it to press. All of these can be synchronized via the Book panel, but that must be done deliberately and correctly. Someone forgets or doesn’t synch correctly, and…. Well, I’m sure you can imagine—or maybe you don’t have to imagine. If you need to deal with two or three different booked documents as a result of page size or orientation differences only once in a while, use the Book panel method. If you need it more often, or just don’t want to add another layer of complication to your workflow, there’s another option.
Page Control Plug-InUntil November 2006, the Book panel option was the only workaround to managing multiple page sizes or orientations in a single document created in InDesign. Then DTP Tools and I released the Page Control plug-in, which works in InDesign CS, CS2, and CS3. With it, you can resize any or all pages—singly or in spreads—change from landscape to portrait, change the vertical alignment of pages within a spread, resize master pages, set document pages to automatically resize according to their assigned masters, and change the size of the pasteboard for more working room—and all of this in one, single InDesign document that can be packaged, printed, exported to PDF, and so on without risky or inconvenient workarounds (see Figure M). And, it prints. Prior to releasing Page Control, we held a public beta period in which we asked printers in the U.S., Australia, and Europe, among other places and groups of professionals, to test it out thoroughly. Whether printed natively from InDesign, printed from an InDesign-exported PDF, or printed first to PostScript, documents containing a full range of different page sizes sailed through RIPs without complaint. As of this writing, Page Control has been available and selling to design and prepress professionals all over the world for several months; I have yet to hear a complaint from anywhere within the for-print process.

We even created a free Page Control Reader plug-in that enables anyone without the full Page Control plug-in to view, edit, save, and output InDesign documents containing multiple page sizes. (Hint, hint, you service bureaus and printers.) If you create documents with different page sizes in a single document, or just want to enlarge your pasteboard, there’s a 14-day try-out version of Page Control included on this book’s download page in the Chapter 7 folder. The BIN file is for Mac installs and the MSI for Windows. Upon installation, the Page Control commands will appear on the Pages panel’s flyout menu. The same installers will also set up Page Control Reader.
to be continued in part V..........


