Designers tell me that they do not really see the purpose of the options in the Transparency palette. OK, let’s start from the beginning.
Isolate Blending
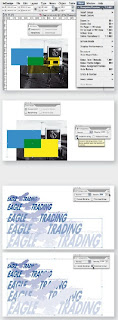
1. A yellow shape is set to overprint the cyan square (select the yellow object and via Window > Attributes tick the Overprint Fill option). Both objects are placed on top of a picture. You know that if you want to see on screen the final result when printed after color separation, you have to enable Overprint Preview via the View menu. The intersection (Cyan + Yellow) is green.
2. Select both shapes and group them Cmd-G / Ctrl-G.
3. In the Transparency palette tick the Isolate Blending option (If you cannot see the Isolate Blending checkbox, choose More Options from the palette menu): the yellow shape will only overprint the cyan square.
Knockout Group
1. Deactivate the Isolate Blending mode and tick the Knockout Group option: the yellow shape creates a hole in the cyan square and thus overprints the image. Still dubious about this feature?
2. OK, here is a series of duplicated logos, and each logo has a different level of opacity. The problem is that we see through each logo, revealing the object behind, but you don’t want that, you just want to create objects that get lighter and lighter.
3. Select all objects and group them.
4. Check the Knockout Group option and there you go.
A Transparent Object with an Opaque Shadow
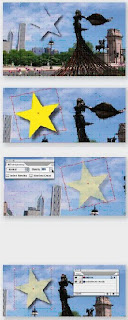
In InDesign, it is impossible to apply a low-level opacity to an object while at the same time keep the shadow 100 % opaque because the effect is applied to the whole frame, effect included. How can we do it ? Very simple ! We will use the previous trick (Knockout Group). This is the effect that we want to achieve.
1. On top of the background picture, draw the shape and apply the desired shadow.
2. As you can see, if I change the opacity of the object, the opacity of the shadow changes with it. Return the object to 100% opacity.
3. Copy the object and paste the copy on top of the very same object via Edit > Paste in Place.
4. Keep the overlapping object selected and remove its shadow. Change the object’s color and set a different opacity, for instance 50 %.
5. Now select both shapes (don’t select the background image) and group them via Cmd-G / Ctrl-G.
6. In the Transparency palette, select the Knockout Group option. Yes ! The overlapping shape knocks out
the bottom shape, and because they To avoid to mistakenly select the background have the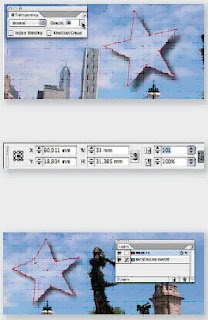 same shape, the one behind image, use layers. And the #1 rule in InDesign is : is knocked out, but not completely : “Whatever the job, always use layers, whether is it a very thin line revealing the THE catalogue of a lifetime or a business card.” underneath object is still visible.
7. To change the opacity of the overlapping object, click outside everything (or Cmd-Shit- A / Ctrl-Shift-A), select it with the White Arrow (Direct Selection Tool) to select it alone even if it is part of a group and set its opacity, for instance, at 0 %. The shadow is still there !
8. To completely cover the very thin line, be sure that the Center Reference Point is selected and set the Scale X and Y Percentage of the selected object (the top one) to 101 %.
9. At this point you can use again the White Arrow to select two overlapping anchor points and modify the shape of the objects ; visually it looks like you’re working on a single transparent object with an opaque shadow.
Isolate Blending
1. A yellow shape is set to overprint the cyan square (select the yellow object and via Window > Attributes tick the Overprint Fill option). Both objects are placed on top of a picture. You know that if you want to see on screen the final result when printed after color separation, you have to enable Overprint Preview via the View menu. The intersection (Cyan + Yellow) is green.
2. Select both shapes and group them Cmd-G / Ctrl-G.
3. In the Transparency palette tick the Isolate Blending option (If you cannot see the Isolate Blending checkbox, choose More Options from the palette menu): the yellow shape will only overprint the cyan square.
Knockout Group
1. Deactivate the Isolate Blending mode and tick the Knockout Group option: the yellow shape creates a hole in the cyan square and thus overprints the image. Still dubious about this feature?
2. OK, here is a series of duplicated logos, and each logo has a different level of opacity. The problem is that we see through each logo, revealing the object behind, but you don’t want that, you just want to create objects that get lighter and lighter.
3. Select all objects and group them.
4. Check the Knockout Group option and there you go.

A Transparent Object with an Opaque Shadow
In InDesign, it is impossible to apply a low-level opacity to an object while at the same time keep the shadow 100 % opaque because the effect is applied to the whole frame, effect included. How can we do it ? Very simple ! We will use the previous trick (Knockout Group). This is the effect that we want to achieve.
1. On top of the background picture, draw the shape and apply the desired shadow.
2. As you can see, if I change the opacity of the object, the opacity of the shadow changes with it. Return the object to 100% opacity.
3. Copy the object and paste the copy on top of the very same object via Edit > Paste in Place.
4. Keep the overlapping object selected and remove its shadow. Change the object’s color and set a different opacity, for instance 50 %.
5. Now select both shapes (don’t select the background image) and group them via Cmd-G / Ctrl-G.
6. In the Transparency palette, select the Knockout Group option. Yes ! The overlapping shape knocks out
the bottom shape, and because they To avoid to mistakenly select the background have the
 same shape, the one behind image, use layers. And the #1 rule in InDesign is : is knocked out, but not completely : “Whatever the job, always use layers, whether is it a very thin line revealing the THE catalogue of a lifetime or a business card.” underneath object is still visible.
7. To change the opacity of the overlapping object, click outside everything (or Cmd-Shit- A / Ctrl-Shift-A), select it with the White Arrow (Direct Selection Tool) to select it alone even if it is part of a group and set its opacity, for instance, at 0 %. The shadow is still there !
8. To completely cover the very thin line, be sure that the Center Reference Point is selected and set the Scale X and Y Percentage of the selected object (the top one) to 101 %.
9. At this point you can use again the White Arrow to select two overlapping anchor points and modify the shape of the objects ; visually it looks like you’re working on a single transparent object with an opaque shadow.

