Search This Blog

Showing posts with label transparency. Show all posts

A Real-Time Reversed Text InDesign Part II

2nd Way
A Text Interacts With A Black Shape

1. Let’s start again from the beginning. Very important, via the View menu, Overprint Preview must be enabled.
2. Draw a shape and colorize it with a Black color, not the default [Black] between brackets, just select the [Black] and by clicking on the New Swatch button at the bottom of the Swatches palette create a new “Black 2”. You can change its name to “Black 100K” for instance.
3. Deselect everything with Cmd- Shift-A / Ctrl-Shift-A and in the Swatches palette’s fly-out menu > New Color Swatch... - Color Type : Spot - Name : Spot Black for Texts and click OK.
4. Now select the text with the Text Tool and colorize its Fill with the “Spot Black for Texts” spot color.

5. Select the Black Arrow so the text frame is selected. Right-click > Arrange > Send to Back so the text frame is behind the black circle.
6. Select the black circle alone and in the Transparency palette, choose the Lighten blending mode. Turn this page to see the final result...
Warning : if you have reproduced the steps to create this effect on a white background, it works perfectly. But if you place the logo on a colored background, the black text will disappear. The workaround is simple and is explained on the previous page (step 6).
7. Move the text frame to see a real-time reversed text effect. The problem now is that a spot color is involved but the goal is usually to print in CMYK mode without a Black spot color. InDesign’s Ink Manager and “Ink Aliases” features can’t
convert all spot inks to process inks without discarding the reversed text effect. Fortunately, Acrobat Professional will do it perfectly. Thus...
8. Export the document in PDF format using the [PDF/X-1a:2001] preset for instance and add other options like bleed and cropmarks.
9. Open the PDF in Acrobat Professional and display Tools > Print Production > Ink Manager...
10. Select the “Spot Black for Texts” spot ink and at the bottom of the window > Ink alias > Process Black then click OK.
11. Tools > Print Production > Output Preview... The PDF is indeed in CMYK mode and both Blacks are on the Process Black plate ; no more spot ink.
12. Check the color separation : File > Print > Advanced... (button) then Output > Color > Separations then close the dialog box with OK and then OK to print. The black objects will only appear on the Black plate. File > Save as... the PDF.

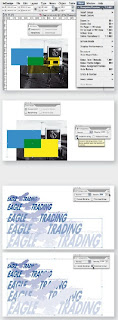
Blending, Trasnparency in InDesign

Designers tell me that they do not really see the purpose of the options in the Transparency palette. OK, let’s start from the beginning.
Isolate Blending
1. A yellow shape is set to overprint the cyan square (select the yellow object and via Window > Attributes tick the Overprint Fill option). Both objects are placed on top of a picture. You know that if you want to see on screen the final result when printed after color separation, you have to enable Overprint Preview via the View menu. The intersection (Cyan + Yellow) is green.
2. Select both shapes and group them Cmd-G / Ctrl-G.
3. In the Transparency palette tick the Isolate Blending option (If you cannot see the Isolate Blending checkbox, choose More Options from the palette menu): the yellow shape will only overprint the cyan square.
Knockout Group
1. Deactivate the Isolate Blending mode and tick the Knockout Group option: the yellow shape creates a hole in the cyan square and thus overprints the image. Still dubious about this feature?
2. OK, here is a series of duplicated logos, and each logo has a different level of opacity. The problem is that we see through each logo, revealing the object behind, but you don’t want that, you just want to create objects that get lighter and lighter.
3. Select all objects and group them.
4. Check the Knockout Group option and there you go.

A Transparent Object with an Opaque Shadow
In InDesign, it is impossible to apply a low-level opacity to an object while at the same time keep the shadow 100 % opaque because the effect is applied to the whole frame, effect included. How can we do it ? Very simple ! We will use the previous trick (Knockout Group). This is the effect that we want to achieve.
1. On top of the background picture, draw the shape and apply the desired shadow.
2. As you can see, if I change the opacity of the object, the opacity of the shadow changes with it. Return the object to 100% opacity.
3. Copy the object and paste the copy on top of the very same object via Edit > Paste in Place.
4. Keep the overlapping object selected and remove its shadow. Change the object’s color and set a different opacity, for instance 50 %.
5. Now select both shapes (don’t select the background image) and group them via Cmd-G / Ctrl-G.
6. In the Transparency palette, select the Knockout Group option. Yes ! The overlapping shape knocks out
the bottom shape, and because they To avoid to mistakenly select the background have the
same shape, the one behind image, use layers. And the #1 rule in InDesign is : is knocked out, but not completely : “Whatever the job, always use layers, whether is it a very thin line revealing the THE catalogue of a lifetime or a business card.” underneath object is still visible.
7. To change the opacity of the overlapping object, click outside everything (or Cmd-Shit- A / Ctrl-Shift-A), select it with the White Arrow (Direct Selection Tool) to select it alone even if it is part of a group and set its opacity, for instance, at 0 %. The shadow is still there !
8. To completely cover the very thin line, be sure that the Center Reference Point is selected and set the Scale X and Y Percentage of the selected object (the top one) to 101 %.
9. At this point you can use again the White Arrow to select two overlapping anchor points and modify the shape of the objects ; visually it looks like you’re working on a single transparent object with an opaque shadow.

Opening Photoshop files in Illustrator

When opening a Photoshop file in Illustrator, you can preserve masks, blending modes, and transparency, and convert layers to separate Illustrator objects. When exporting an Illustrator file to Photoshop format, you can preserve layers, opacity masks, transparency (including blending modes), slices, image maps, compound shapes, and editable type.
Illustrator does not support some Photoshop features such as adjustment layers and layer effects. To maintain the effects in Illustrator, select Convert Photoshop Layers to Objects in the Photoshop Import dialog box, or flatten individual layers in Photoshop to embed the effects before importing the file into Illustrator.

Layer mask in Photoshop (top) converts to opacity mask in Illustrator (bottom), with preserved
blending mode and transparency.

To open a file created by Photoshop:
1 Choose File > Open.
2 Locate and select a Photoshop file, and click Open.
3 In the Photoshop Import dialog box, choose a method to import Photoshop layers to Illustrator:
• Select the Convert Photoshop Layers to Objects option to create a single layer in Illustrator containing objects that correspond to each Photoshop layer or clipping path (Illustrator only imports one clipping path per Photoshop file). If the Photoshop document contains layer sets, you can create corresponding sublayers. Any opacity masks that were applied to the Photoshop layers appear in the Transparency palette when you select the corresponding objects or sub layers. When you use the Convert Photoshop Layers to Objects option, Illustrator uses an automatic selective merging (of layers) feature to maintain appearance. If you don’t require access to layers and objects, you can choose the Flatten Photoshop Layers to a Single Image option instead.
• Select the Flatten Photoshop Layers to a Single Image option to flatten all Photoshop layers into a single image, and place the image on Layer 1 in the Illustrator file. The converted file retains clipping paths but no individual objects. Transparency is retained as part of the main image, but is not editable.
4 If you want to import image maps or slices that are included in the Photoshop file, select Import Image Maps or Import Slices.
5 Click OK.

Note: Do not place EPS files containing mesh objects or transparency objects if it was created in an application other than Illustrator. Instead, open the EPS file, copy all objects and then paste in Illustrator.

To place and link files created by other applications:
1 Open the Illustrator file into which you want to place the artwork.
2 Choose File > Place.
3 Locate and select the file you want to place. If you don’t see the name of the file you want, the file has been saved in a format that Illustrator cannot read.
4 Do one of the following:
• To create a link between the artwork file and the Illustrator file, make sure the Link option is selected in the Place dialog box.
• To embed the artwork in the file deselect the Link option in the Place dialog box.
• To create a template layer using the file, select Template.
• To replace an existing placed file, select Replace. (This option is only available if you select the file to be replaced before choosing File > Place.)
5 Click Place. The artwork is placed into the Illustrator file as either a linked or an embedded image, depending on the option you selected in the Place dialog box.

Importing EPS and PDF files into Illustrator
You can use Adobe Illustrator to edit artwork that was imported as Encapsulated PostScript (EPS) and Adobe Portable Document Format (PDF) file types. You can import PDF and EPS files using these commands:
• The Open command to open a PDF or EPS file as a new Illustrator file.
• The Place command to place a PDF or EPS file in the current layer in an existing Illustrator file.

Important: To place an EPS image containing a mesh object as an embedded file (that is, the Link option is deselected in the Place dialog box), the file should be saved as an EPS Level 1 PostScript file.
Blog Widget by LinkWithin