Note: follow the image sequence (A,B,........, I)
Sketch
Before laying down a single brushstroke, it’s important for me to create a rough sketch. It doesn’t have to be perfect, but we need to get our point across here. This will only make things easier during the painting process. Create a new layer and sketch in an eye.
Before laying down a single brushstroke, it’s important for me to create a rough sketch. It doesn’t have to be perfect, but we need to get our point across here. This will only make things easier during the painting process. Create a new layer and sketch in an eye.
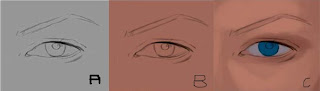 Laying down the Base Color This step is simple enough; here we lay down the base color for the skin. Simply use the Gradient tool here and fill the background layer with your color choice. In general try not to go too light or too saturated here.
Defining Form
Using the HSB Slider, (Windows>Color), pick a darker more saturated color for the darker areas of the skin, and paint it using a simple Hard Edged brush. I also pick a lighter, less saturated tone for the highlights of the skin. I choose a color for the eye, in this case, a bright blue and paint that in as well.
 Bringing Life to the Skin
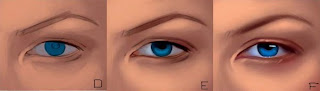
The values of the skin need some work here. I choose an even brighter, lighter color to define the form of the skin. I introduce the lighter tones according to the lighting here, which is a standard front light. I add the lighter tones to the tone, the bridge of the nose, near the eyebrow, and around the eyelid to make things appear more realistic.
Smoothing Out the Skin
At this point, all my work was done using a standard Hard Edged brush, which is great for defining form quickly. To blend the skin and give it a more photo realistic look, I now switch to a soft brush (Hardness at 0%) and Opacity at 50%. I blend all the sharp transitions until things appear much smoother. Additionally, I paint darker tones on the blue iris to give it more depth.
Bringing More Life
At this point I work a bit more on the skin tones, adding some more saturated reddish tones on the area around the eye, as well as the cheek. I also add a more saturated blue to the eye as well. I do this all with a soft airbrush at a fairly low opacity on a new layer, then merge it down when I’m satisfied with how things are looking. I also do some more detail work using a softer Hard Edged brush as well.
 Details
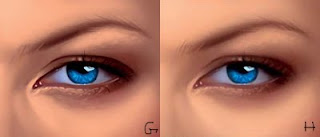
I’m satisfied with how things are looking at this stage, so I start working on the details. Using a fairly small brush, I begin to add some ‘bumps’ around the eye to give it a more realistic looks. I also create bumps around the eyebrow using a both a fairly light as well as dark color to help it pop for a realistic look. I also add details in the iris using a lighter bluish color to really bring the image to life. I work in at a very large zoom at this stage as well to make things easier and more accurate.
Refinement
I go over everything with a Soft Edged brush at a low opacity for a more realistic look. Additionally I bring out the details more using fairly small, hard edged brushes. I work on the eyebrow, painting each strand in, as well as the eyelashes.
Color and Texture Enhancement
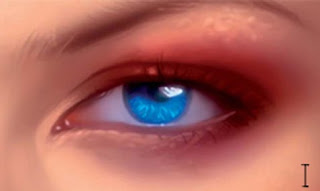
Things are looking a bit too muddy for my taste, so what I do here is create a new layer set to soft light, and enhance the colors quite a bit. I introduce much warmer tones around the eye to give it more life. Finally, I slightly overlay a leather photo texture to give the skin a slightly more realistic effect.
0 comments:
Post a Comment
Please enter you comments or your question what ever you have regarding Graphic Designing. Thanks