Search This Blog

Showing posts with label photoshop. Show all posts

How to make a real eye in Photoshop?

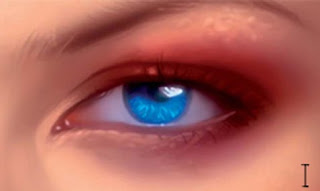
Note: follow the image sequence (A,B,........, I)
Sketch
Before laying down a single brushstroke, it’s important for me to create a rough sketch. It doesn’t have to be perfect, but we need to get our point across here. This will only make things easier during the painting process. Create a new layer and sketch in an eye.
Laying down the Base Color This step is simple enough; here we lay down the base color for the skin. Simply use the Gradient tool here and fill the background layer with your color choice. In general try not to go too light or too saturated here.
Defining Form
Using the HSB Slider, (Windows>Color), pick a darker more saturated color for the darker areas of the skin, and paint it using a simple Hard Edged brush. I also pick a lighter, less saturated tone for the highlights of the skin. I choose a color for the eye, in this case, a bright blue and paint that in as well. Bringing Life to the Skin
The values of the skin need some work here. I choose an even brighter, lighter color to define the form of the skin. I introduce the lighter tones according to the lighting here, which is a standard front light. I add the lighter tones to the tone, the bridge of the nose, near the eyebrow, and around the eyelid to make things appear more realistic.
Smoothing Out the Skin
At this point, all my work was done using a standard Hard Edged brush, which is great for defining form quickly. To blend the skin and give it a more photo realistic look, I now switch to a soft brush (Hardness at 0%) and Opacity at 50%. I blend all the sharp transitions until things appear much smoother. Additionally, I paint darker tones on the blue iris to give it more depth.
Bringing More Life
At this point I work a bit more on the skin tones, adding some more saturated reddish tones on the area around the eye, as well as the cheek. I also add a more saturated blue to the eye as well. I do this all with a soft airbrush at a fairly low opacity on a new layer, then merge it down when I’m satisfied with how things are looking. I also do some more detail work using a softer Hard Edged brush as well. Details
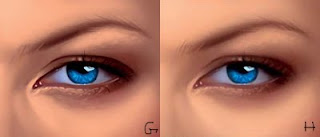
I’m satisfied with how things are looking at this stage, so I start working on the details. Using a fairly small brush, I begin to add some ‘bumps’ around the eye to give it a more realistic looks. I also create bumps around the eyebrow using a both a fairly light as well as dark color to help it pop for a realistic look. I also add details in the iris using a lighter bluish color to really bring the image to life. I work in at a very large zoom at this stage as well to make things easier and more accurate.
Refinement
I go over everything with a Soft Edged brush at a low opacity for a more realistic look. Additionally I bring out the details more using fairly small, hard edged brushes. I work on the eyebrow, painting each strand in, as well as the eyelashes.
Color and Texture Enhancement
Things are looking a bit too muddy for my taste, so what I do here is create a new layer set to soft light, and enhance the colors quite a bit. I introduce much warmer tones around the eye to give it more life. Finally, I slightly overlay a leather photo texture to give the skin a slightly more realistic effect.
How to make an Human Eye

Create a new document of 1560 x 1040 px
Create 17 layers and name them as : layer 00, layer 01 ... layer 16


Abbreviation
L: Layer
SRB : use a soft round brush
W : Width
C : Color
O : Opacity
E : eraser
GB : Apply a gaussian blur

Layer00 . Apply the color #8d8d8d
layer16 . Draw the shape : SRB (C : black ; W : 15 px ; O : 100%)
layer01 . Color each part : SRB (W : 100 px ; O : 100%) C : #5a5a5a / black / #f2f2f2
layer01 . GB 7 px

layer 02 . SRB (C : #3a3a3a ; W : 100px ; O : 100%)

The skin crease is more marked in the upper eyelid than in the lower eyelid
layer 02 . GB (30px)
layer 02 . Erase if the shadow is too large : E (W : 100px ; O : 100%)


layer 03 . SRB (C : black ; W : 50px ; O : 10%)

layer 03 . GB (15px)
Hide L16

layer 04 . Continue to work on the shadows (don't forget the eyeball) : SRB (C : black ; W : 100px ; O : 5%

layer 04 . GB (30px)
layer 05 . Start to work on the lights : SRB (C : white; W : 65px ; O : 15%)

layer 05 . GB (15px)
layer 06 . Work again on the shadows with a different size of brush : SRB (C : black ; W : 200px ; O : 15%) & SRB (C : black ; W : 45px ; O : 15%)

layer 07 . Use this layer to work on the detailed lights (iris...) with a little brush : SRB (C : white ; W : 20px ; O : 10%)
layer 08 . Use this layer to draw the largest light : SRB (C : white ; W : 100px and 200px ; O : 10%) and adjust with E (W : 65px ; O : 100%)

Merge all the layers : layer 00+ layer 01+...+ layer 08

Use dodge and bum (expo : 4% ; W : 200px/50px) to correct shadows and lights as you want

Eyelashes : The eyelashes belonging to the upper lids and the lower lids vary from each other. The upper lid eyelashes are longer, tend to curve in an upward direction, and are more noticeable than the lower lid eyelashes, which are shorter and tend to be stumpy without much curve. There are two or three rows of eyelashes in the upper eyelid and one or two rows of eyelashes in the lower eyelid.

layer 09 . Draw eyelashes on upper lids : SRB (C : black ; W : 17px ; O : 100%)

layer 09 . Smudge the extremities of eyelashes : Smudge (W : 45 ; strength : 25%) and correct if it's too long with E (W : 65% ; O : 100%)

layer 10 . Use the same tools for eyelashes of lower lid

layer 11. Add some shadows with a big brush under the eyelashes : SRB (C : black ; W : 100px ; O : 10%)
layer 11. GB (25px)

Create a New Adjustment Layer : Gradient Map :

Black (0 %) #421706 (16%) # c18362 (44%) #ffdba3 (70%) #ffe2c8 (88%) white (100%)

layer 12 . Change the layer blending mode to Hue and its opacity to 70% and color the iris : SRB (C : #175769 ; W : 100px ; O : 100%)

layer 13 . Change the layer blending mode to Color burn and draw with a SRB (C : #cfc179 ; W : 100p x ; O : 100%)

layer 14 . Change the layer blending mode to Hue and its opacity to 80% and color the eyeball : SRB (C : #436d94 ; W : 100px ; O : 100%)

layer 15 . Change the layer blending mode to Multiply and draw the outline of the iris : SRB (C : #366561 ; W : 30px ; O : 15%) GB (8px)
Make any necessary corrections...

I hope you enjoyed this tutorial

Opening Photoshop files in Illustrator

When opening a Photoshop file in Illustrator, you can preserve masks, blending modes, and transparency, and convert layers to separate Illustrator objects. When exporting an Illustrator file to Photoshop format, you can preserve layers, opacity masks, transparency (including blending modes), slices, image maps, compound shapes, and editable type.
Illustrator does not support some Photoshop features such as adjustment layers and layer effects. To maintain the effects in Illustrator, select Convert Photoshop Layers to Objects in the Photoshop Import dialog box, or flatten individual layers in Photoshop to embed the effects before importing the file into Illustrator.

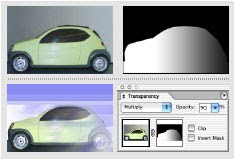
Layer mask in Photoshop (top) converts to opacity mask in Illustrator (bottom), with preserved
blending mode and transparency.

To open a file created by Photoshop:
1 Choose File > Open.
2 Locate and select a Photoshop file, and click Open.
3 In the Photoshop Import dialog box, choose a method to import Photoshop layers to Illustrator:
• Select the Convert Photoshop Layers to Objects option to create a single layer in Illustrator containing objects that correspond to each Photoshop layer or clipping path (Illustrator only imports one clipping path per Photoshop file). If the Photoshop document contains layer sets, you can create corresponding sublayers. Any opacity masks that were applied to the Photoshop layers appear in the Transparency palette when you select the corresponding objects or sub layers. When you use the Convert Photoshop Layers to Objects option, Illustrator uses an automatic selective merging (of layers) feature to maintain appearance. If you don’t require access to layers and objects, you can choose the Flatten Photoshop Layers to a Single Image option instead.
• Select the Flatten Photoshop Layers to a Single Image option to flatten all Photoshop layers into a single image, and place the image on Layer 1 in the Illustrator file. The converted file retains clipping paths but no individual objects. Transparency is retained as part of the main image, but is not editable.
4 If you want to import image maps or slices that are included in the Photoshop file, select Import Image Maps or Import Slices.
5 Click OK.

Note: Do not place EPS files containing mesh objects or transparency objects if it was created in an application other than Illustrator. Instead, open the EPS file, copy all objects and then paste in Illustrator.

To place and link files created by other applications:
1 Open the Illustrator file into which you want to place the artwork.
2 Choose File > Place.
3 Locate and select the file you want to place. If you don’t see the name of the file you want, the file has been saved in a format that Illustrator cannot read.
4 Do one of the following:
• To create a link between the artwork file and the Illustrator file, make sure the Link option is selected in the Place dialog box.
• To embed the artwork in the file deselect the Link option in the Place dialog box.
• To create a template layer using the file, select Template.
• To replace an existing placed file, select Replace. (This option is only available if you select the file to be replaced before choosing File > Place.)
5 Click Place. The artwork is placed into the Illustrator file as either a linked or an embedded image, depending on the option you selected in the Place dialog box.

Importing EPS and PDF files into Illustrator
You can use Adobe Illustrator to edit artwork that was imported as Encapsulated PostScript (EPS) and Adobe Portable Document Format (PDF) file types. You can import PDF and EPS files using these commands:
• The Open command to open a PDF or EPS file as a new Illustrator file.
• The Place command to place a PDF or EPS file in the current layer in an existing Illustrator file.

Important: To place an EPS image containing a mesh object as an embedded file (that is, the Link option is deselected in the Place dialog box), the file should be saved as an EPS Level 1 PostScript file.

PhotoShop: Creating snow or rain

Creating snow or rain
Here’s a multiuse technique that you can use to create falling snow or rain (as shown in Figure):

1. Add a new layer to your image by clicking the New Layer button in the Layers palette.
2. Still in the Layers palette, change the layer’s blending mode from Normal to Screen. Because this technique uses a separate layer, you can consider it to be nondestructive (you can always delete the layer later), so you don’t have to work on a copy of your image. But it’s always a good idea to work on a copy, just in case.
3. Choose Edit>Fill to fill the layer with black. Because the layer’s blending mode is Screen, you won’t see the black fill.
4. Add Noise to the layer. Use the Noise>Add Noise filter to add some variation to the layer. Use
Amount: 20%, Distribution: Gaussian, and mark the Monochromatic check box.
5. Enlarge the noise with the Crystallize filter. Use the Pixelate>Crystallize filter to turn the little noise into larger chunks. Use Cell Size: 3 for small snow or rain; try 7 or 10 for larger
flakes. You can also apply a slight Gaussian Blur to increase the size.
6. Sharpen the edges. Using the Unsharp Mask filter, sharpen until the snowflakes have distinct
edges. Use Amount: 100%, Radius: 2, Threshold: 0. When you create rain, use Amount: 40%.
7. Apply a Levels adjustment. In the Levels dialog box, drag the middle slider about halfway to the left; then drag the left slider slowly to the right until you see the amount of snow or rain that you want. Afterward, if desired, you can apply the Motion Blur filter to the falling snow/rain. And, of course, you can add a layer mask to control visibility.
Blog Widget by LinkWithin