Search This Blog

Showing posts with label adobe Illustrator. Show all posts

Illustrator: Why colors sometimes don’t match?

No device in a publishing system is capable of reproducing the full range of colors viewable to the human eye. Each device operates within a specific color space which can produce a certain range, or gamut, of colors.

The RGB (red, green, blue) and CMYK (cyan, magenta, yellow, and black) color models represent two main categories of color spaces. The gamuts of the RGB and CMYK spaces are very different; while the RGB gamut is generally larger (that is, capable of representing more colors) than CMYK, some CMYK colors still fall outside the RGB gamut. In addition, different devices produce slightly different gamuts within the same color model. For example, a variety of RGB spaces can exist among scanners and monitors, and a variety of CMYK spaces can exist among printing presses.

Because of these varying color spaces, colors can shift in appearance as you transfer documents between different devices. Color variations can result from different image sources (scanners and software produce art using different color spaces), differences in brands of computer monitors, differences in the way software applications define color, differences in print media (newsprint paper reproduces a smaller gamut than magazine quality paper), and other natural variations, such as manufacturing differences in monitors or monitor age.

Illustrator: What is Trapping? How to do trapping? II

To create a trap using the Trap command:
1 Select two or more objects, choose Window > Show Pathfinder, and select Trap from the palette’s pop-out menu.
2 In the Thickness text box, enter a stroke width of between 0.01 and 5000 points. Check with your print shop to determine what value to use.
3 Enter a value in the Height/Width% text box to specify the trap on horizontal lines as a percentage of the trap on vertical lines. Specifying different horizontal and vertical trap values lets you compensate for on-press irregularities, such as paper stretch. Contact your print shop for help in determining this value. The default value of 100% results in the same trap width on horizontal lines and on vertical lines.
To increase the trap thickness on horizontal lines without changing the vertical trap, set the Height/Width value to greater than 100%. To decrease the trap thickness on horizontal lines without changing the vertical trap, set the Height/Width value to less than 100%.

4 Enter a Tint Reduction value to change the tint of the trap. The default value is 40%. The Tint Reduction value reduces the values of the lighter color being trapped; the darker color values remain at 100%. The Tint Reduction value also affects the values of custom colors.

5 Select additional trapping options as required:
• Traps with Process Color if you want to convert spot color traps to equivalent process colors. This option creates an object of the lighter of the spot colors and overprints it.
• Reverse Traps to trap darker colors into lighter colors. This option does not work with rich black—that is, black that contains additional CMY inks.
6 Click OK to create a trap on the selected objects. Click Defaults to return to the default trapping values.

Trapping by overprinting
For more precise control of trapping and for trapping complex objects, you can create the effect of a trap by stroking an object and setting the stroke to overprint.

To create a spread or choke by overprinting:
1 Select the topmost object of the two objects that must trap into each other.
2 In the Stroke box in the toolbox or the Color palette, do one of the following:
• Create a spread by entering the same color values for the Stroke as appear in the Fill option. You can change the stroke’s color values by selecting the stroke and then adjusting its color values in the Color palette. This method enlarges the object by stroking its boundaries with the same color as the object’s fill.

• Create a choke by entering the same color values for the Stroke as appear in the lighter background (again, using the Color palette); the Stroke and Fill values will differ. This method reduces the darker object by stroking its boundaries with the lighter background color.
3 Choose Window > Show Stroke.
4 In the Stroke palette, in the Weight text box enter a stroke width of between 0.6 and 2.0 points. A stroke weight of 0.6 point creates a trap of 0.3 point. A stroke weight of 2.0 points creates a trap of 1.0 point. Check with your print shop to determine what value to use.
5 Choose Window > Show Attributes.
6 Select Overprint Stroke.
In a spread, the lighter object traps into (overprints) the darker background. In a choke, overprinting the stroke causes the lighter background to trap into the darker object.

To trap a line:
1 Select the line to be trapped.
2 In the Stroke box in the toolbox or the Color palette, assign the stroke a color of white.
3 In the Stroke palette, select the desired line weight.
4 Copy the line, and choose Edit > Paste in Front. The copy is used to create a trap.
5 In the Stroke box in the toolbox or the Color palette, stroke the copy with the desired color.
6 In the Stroke palette, choose a line weight that is wider than the bottom line.
7 Choose Window > Show Attributes.
8 Select Overprint Stroke for the top line.

To trap a portion of an object:
1 Draw a line along the edge or edges that you want to trap. If the object is complex, use the direct-selection tool to select the edges, copy it, and choose Edit > Paste in Front to paste the copy directly on top of the original.

2 In the Stroke box in the toolbox or the Color palette, select a color value for the Stroke to create either a spread or a choke. If you are uncertain about what type of trap is appropriate,
3 Choose Window > Show Attributes.
4 Select Overprint Stroke.


(Special Note: these images are named as trap, trap2, trap3 etc. consider them by this sequence, do not bother yourself with the placement of the images here.)


Illustrator: What is Trapping? How to do trapping? I

About traps
When overlapping painted objects share a common color, trapping may be unnecessary if the color that is common to both objects creates an automatic trap. For example, if two overlapping objects contain cyan as part of their CMYK values, any gap between them is covered by the cyan content of the object underneath.

Note: When artwork does contain common ink colors, overprinting does not occur on the shared plate.

There are two types of trap:
A spread, in which a lighter object overlaps a darker background and seems to expand into the background.
and
A choke, in which a lighter background overlaps a darker object that falls within the background and seems to squeeze or reduce the object.

You can create both spreads and chokes in the Adobe Illustrator program. It is generally best to scale your graphic to its final size before adding a trap. Once you create a trap for an object, the amount of trapping increases or decreases if you scale the object. For example, if you create a graphic that has a 0.5-point trap and scale it to five times its original size, the result is a 2.5-point trap for the enlarged graphic.

Trapping with tints
When trapping two light-colored objects, the trap line may show through the darker of the two colors, resulting in an unsightly dark border. For example, if you trap a light yellow object into a light blue object, a bright green border is visible where the trap is created.
To prevent the trap line from showing through, you can specify a tint of the trapping color (here, the yellow color) to create a more pleasing effect. Check with your print shop to find out what percentage of tint is most appropriate given the type of press, inks, paper stock, and so on being used.

Trapping type
Trapping type can present special problems. Avoid applying mixed process colors or tints of process colors to type at small point sizes, because any misregistration can make the text difficult to read. Likewise, trapping type at small point sizes can result in hard-to-read type. As with tint reduction, check with your print shop before trapping such type. For example, if you are printing black type on a colored background, simply overprinting the type onto the background may be enough. To trap type, you can add the stroke below the fill in the Appearance palette, and set the stroke to overprint (or set it to Multiply blending mode).

Using the Trap command
The Trap command creates traps for simple objects by identifying the lighter artwork— whether it’s the object or the background—and overprinting (trapping) it into the darker artwork.

Note: The Trap command is only available when you are working on CMYK documents.

You can apply the Trap command as a Pathfinder command or as an effect.

In some cases, the top and bottom objects may have similar color densities so that one color is not obviously darker than the other. In this case, the Trap command determines the trap based on slight differences in color; if the trap specified by the Trap dialog box is not satisfactory, you can use the Reverse Trap option to switch the way in which the Trap command traps the two objects.

See next guidance trip

(Special Note: all the figures regarding this topic "trapping" are at the end of this guidance trip.)

Creating corner tiles for brush patterns

Corner tiles lend special border effects when applying brush patterns. You can create corner tiles from scratch, or you can use a brush pattern’s side tile as the basis for designing complementary outer and inner (reflected –135 degrees) corner tiles.
To create symmetrical corner tiles from a side tile:
1
Choose File > Open, locate a brush pattern file, supplied with Adobe Illustrator, that you want to use, and click Open.
2 Choose Window > Brushes. Select the tile you want to use, and drag it to the center of your artwork.
3 If the tile does not have a square bounding box, create a box that completely encompasses the artwork, the same height as the side tile. (Side tiles can be rectangular.) Fill and stroke the box with None, and choose Object > Arrange > Send to Back to make the box backmost in your artwork. (The bounding box helps you align the new tile.)
4 Select the tile and the bounding box.
5 Use the rotate tool to rotate the tile and its bounding box 180 degrees.
Pasted tile (left) and tile rotated 180º (right)
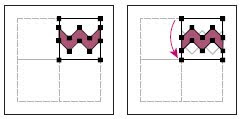
6 Using the rotate tool, Alt+Shift (Windows) or Option+Shift (Mac OS) the lower left corner of the bounding box. Enter a value of 90 degrees, and click Copy to create a copy flush left of the first tile. This tile becomes the corner tile.
7 Using the selection tool, drag the left tile down by the top right anchor point, pressing Alt+Shift (Windows) or Option+Shift (Mac OS) to make a copy and constrain the move so that you create a third tile beneath the second. When the copy’s upper right anchor point snaps to the corner tile’s lower right anchor point, release the mouse button and Alt+Shift (Windows) or Option+Shift (Mac OS).
You use the third copy for alignment.
Rotate 90º and copy left tile (left). Then Alt-drag/Option-drag corner tile to make copy
beneath it (right).
8 Select the artwork in the right tile. Drag it to the left, pressing Alt+Shift (Windows) or Option+Shift (Mac OS) so that the artwork overlaps that in the corner tile.
Copy (left) and move upper right tile over corner tile (right).
9 Edit the corner tile so that its artwork lines up vertically and horizontally with the tiles next to it. Select and delete any portions of the tile that you do not want in the corner and edit the remaining art to create the final outer corner tile.
Unneeded elements selected (left) and deleted; Final outer corner tile (right).
10 Select all of the tile including the bounding box.
11 Save the new pattern
12 Double-click the new pattern swatch to bring up the Swatch Options dialog box, name the tile as a variation of the original (for example, use the suffix .outer), and click OK.

To create an inner corner tile:
Do one of the following:
• If the side tile for the brush pattern is horizontally symmetric (that is, if it looks the same when flipped top to bottom), you can use the same tile for the inner corner tile as for the outer corner tile.
• If the side tile for the brush pattern is not horizontally symmetric, follow the same steps as to create symmetrical corner tiles from a side tile, but skip step 5 (rotating the tile by 180 degrees).

Blog Widget by LinkWithin