Corner tiles lend special border effects when applying brush patterns. You can create corner tiles from scratch, or you can use a brush pattern’s side tile as the basis for designing complementary outer and inner (reflected –135 degrees) corner tiles.
To create symmetrical corner tiles from a side tile:
1 Choose File > Open, locate a brush pattern file, supplied with Adobe Illustrator, that you want to use, and click Open.
2 Choose Window > Brushes. Select the tile you want to use, and drag it to the center of your artwork.
3 If the tile does not have a square bounding box, create a box that completely encompasses the artwork, the same height as the side tile. (Side tiles can be rectangular.) Fill and stroke the box with None, and choose Object > Arrange > Send to Back to make the box backmost in your artwork. (The bounding box helps you align the new tile.)
4 Select the tile and the bounding box.
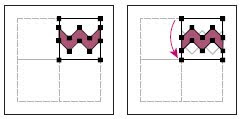
5 Use the rotate tool to rotate the tile and its bounding box 180 degrees.
Pasted tile (left) and tile rotated 180º (right)
6 Using the rotate tool, Alt+Shift (Windows) or Option+Shift (Mac OS) the lower left corner of the bounding box. Enter a value of 90 degrees, and click Copy to create a copy flush left of the first tile. This tile becomes the corner tile.
7 Using the selection tool, drag the left tile down by the top right anchor point, pressing Alt+Shift (Windows) or Option+Shift (Mac OS) to make a copy and constrain the move so that you create a third tile beneath the second. When the copy’s upper right anchor point snaps to the corner tile’s lower right anchor point, release the mouse button and Alt+Shift (Windows) or Option+Shift (Mac OS).
You use the third copy for alignment.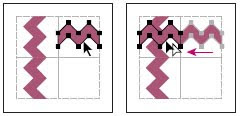
Rotate 90º and copy left tile (left). Then Alt-drag/Option-drag corner tile to make copy
beneath it (right).
8 Select the artwork in the right tile. Drag it to the left, pressing Alt+Shift (Windows) or Option+Shift (Mac OS) so that the artwork overlaps that in the corner tile.
Copy (left) and move upper right tile over corner tile (right).
9 Edit the corner tile so that its artwork lines up vertically and horizontally with the tiles next to it. Select and delete any portions of the tile that you do not want in the corner and edit the remaining art to create the final outer corner tile.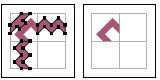
Unneeded elements selected (left) and deleted; Final outer corner tile (right).
10 Select all of the tile including the bounding box.
11 Save the new pattern
12 Double-click the new pattern swatch to bring up the Swatch Options dialog box, name the tile as a variation of the original (for example, use the suffix .outer), and click OK.
To create an inner corner tile:
Do one of the following:
• If the side tile for the brush pattern is horizontally symmetric (that is, if it looks the same when flipped top to bottom), you can use the same tile for the inner corner tile as for the outer corner tile.
• If the side tile for the brush pattern is not horizontally symmetric, follow the same steps as to create symmetrical corner tiles from a side tile, but skip step 5 (rotating the tile by 180 degrees).
To create symmetrical corner tiles from a side tile:
1 Choose File > Open, locate a brush pattern file, supplied with Adobe Illustrator, that you want to use, and click Open.
2 Choose Window > Brushes. Select the tile you want to use, and drag it to the center of your artwork.
3 If the tile does not have a square bounding box, create a box that completely encompasses the artwork, the same height as the side tile. (Side tiles can be rectangular.) Fill and stroke the box with None, and choose Object > Arrange > Send to Back to make the box backmost in your artwork. (The bounding box helps you align the new tile.)
4 Select the tile and the bounding box.
5 Use the rotate tool to rotate the tile and its bounding box 180 degrees.
Pasted tile (left) and tile rotated 180º (right)
6 Using the rotate tool, Alt+Shift (Windows) or Option+Shift (Mac OS) the lower left corner of the bounding box. Enter a value of 90 degrees, and click Copy to create a copy flush left of the first tile. This tile becomes the corner tile.
7 Using the selection tool, drag the left tile down by the top right anchor point, pressing Alt+Shift (Windows) or Option+Shift (Mac OS) to make a copy and constrain the move so that you create a third tile beneath the second. When the copy’s upper right anchor point snaps to the corner tile’s lower right anchor point, release the mouse button and Alt+Shift (Windows) or Option+Shift (Mac OS).
You use the third copy for alignment.

Rotate 90º and copy left tile (left). Then Alt-drag/Option-drag corner tile to make copy
beneath it (right).
8 Select the artwork in the right tile. Drag it to the left, pressing Alt+Shift (Windows) or Option+Shift (Mac OS) so that the artwork overlaps that in the corner tile.
Copy (left) and move upper right tile over corner tile (right).
9 Edit the corner tile so that its artwork lines up vertically and horizontally with the tiles next to it. Select and delete any portions of the tile that you do not want in the corner and edit the remaining art to create the final outer corner tile.

Unneeded elements selected (left) and deleted; Final outer corner tile (right).
10 Select all of the tile including the bounding box.
11 Save the new pattern
12 Double-click the new pattern swatch to bring up the Swatch Options dialog box, name the tile as a variation of the original (for example, use the suffix .outer), and click OK.
To create an inner corner tile:
Do one of the following:
• If the side tile for the brush pattern is horizontally symmetric (that is, if it looks the same when flipped top to bottom), you can use the same tile for the inner corner tile as for the outer corner tile.
• If the side tile for the brush pattern is not horizontally symmetric, follow the same steps as to create symmetrical corner tiles from a side tile, but skip step 5 (rotating the tile by 180 degrees).
0 comments:
Post a Comment
Please enter you comments or your question what ever you have regarding Graphic Designing. Thanks