A:
The Pencil tool has its uses, but its freehand drawing is not a substitute for the precision of the Pen tool. Rather, it’s a complement to it, another tool in your belt. If you need a path that feels more natural, more hand drawn or hand written, go for the Pencil tool—especially if you have an electronic tablet whose stylus lets you draw with an honest-to goodness writing utensil. Mousing or track balling with the Pencil tool is difficult and requires a very steady hand. Every little stutter or hitch creates new anchor points—several of them—that you’ll probably want to clean up.
There’s the chief minus to the Pencil tool’s pluses:
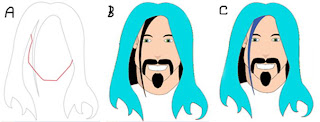
Remember when I said you want a path without extraneous anchor points? Swipe the Pencil tool across the page and just try to count all those anchor points. Man, if you need to reshape that path… Let’s try a tracing exercise with the Pencil tool. Grab the Pencil tool and, beginning with one path or one color area. Do your best to trace over it with the Pencil tool’s freehand path. Hold Cmd/Ctrl and click in an empty area of the page to deselect your path. Now, try drawing another path right up against to the first—start within a few pixels of the first, in fact, and let your second path overlap the first one as in Figure A. Whoa! Didn’t see that coming; did you?
Modifying Paths with the Pencil Tool
Another difference between the Pen and Pencil tools is in how each relates to pre-existing paths. The Pen will happily create independent path after independent path atop any previous paths without altering previous paths. Conversely, the Pencil tool will alter paths to which it draws near. Although jarring at first, this is actually a very cool feature because it allows you to modify paths drawn with the Pen, Pencil, shape, and frame tools as well as type converted to paths, all with the speed and handiness of the Pencil. (If you’d like to get your previous path back, undo the Pencil action with Cmd+Z/Ctrl+Z.) Let’s try some intentional modifications.
1. Clear any paths you’ve already created in the the document (indd file).
2. With the Pencil tool, trace the cartoon’s outer hair line as closely as possible, leaving the face area open but completely ignoring the spike of bangs in the front—just draw right past it as if it wasn’t there. Give the path a fill color. See Figure B.
3. Zoom in to where the bangs meet the main hair line, and with the white Direct Selection tool, select the path you just finished drawing.
4. Switch back to the Pencil tool and position its tip atop one of the anchor points in your path around the intersection of the bangs with the rest of the hair. The small X in the Pencil tool cursor will disappear when you’re in the right spot.
5. Click the anchor point, and draw the spike of bang, coming back up and terminating that path on a different anchor point in your first path (see Figure C).
The result will be that the bangs are added to the main hair path, with the two paths fully
merged. If you got differing results, undo and try again, ensuring that you both begin and end your drawing on anchor points already in the path. Again, it takes a very steady hand as well as good hand-eye coordination to work with the Pencil tool in this manner. You might find it helpful to zoom in on areas of the drawing as you work, but note that it’s still extremely fine work even zoomed far in. Let’s try modifying the path shape instead of just adding to it.
1. With the hair path still selected, find an anchor point around the length to which you’d like to cut the hair.
2. Once again, click the Pencil tool on the anchor point. This time, however, drag across the interior of the object to another anchor point on the other side instead of dragging outside the path. When you let go, one of two things will happen: Either you’ll have a haircut or you’ll have hair only on the shoulders. If it’s the latter case, undo, then repeat step 2 in the opposite direction. If you began with an anchor point on the left and dragged left to right, start this time with an anchor point on the right and drag back to the left. That should chop off your locks. The reason you might have gotten either result is because paths have a direction. Depending on whether you drew the original path clockwise or counterclockwise, the direction in which you take the Pencil tool will reshape or chop one side or the other. Thankfully, Undo backs you out if the result opposed what you expected.
Drawing from a path segment instead of from an anchor point will terminate the path at that point, allowing you to completely reshape a section. In such a case, the Pencil tool will create new anchor points at the inception and termination locations—and everywhere in between—as needed. Just in case it’s not obvious, the Pencil tool can modify not only paths drawn with the Pencil, but any unlocked, modifiable path, such as one you might create with the Pen or Rectangle tools. So, what are you to do if you just want to draw one path near another without adding to, subtracting from, or reshaping the first? Easy: Don’t start drawing directly on a pre-existing anchor point or path segment. Begin drawing outside (or inside) a path area and the Pencil tool ignores what’s underneath and creates a new, completely independent path. The distinction is in the proximity of existing paths to where you click to initiate drawing with the Pencil tool; begin within a few pixels of an existing path to modify it, further out to ignore it. If you’r new, independent pencil path must begin within the modification zone of an existing path, a useful trick is to begin the new path on a new layer, locking the layer or layers containing lower paths.
Cleaning Up Pencil Paths
Getting back to the Hera the Pencil tool, has two other aspects: Juno the Smooth tool and Frigga the Erase tool. As noted previously, Pencil tool drawing creates many, many anchor points; the slightest twitch in your wrist could create an unsightly bump or divot in an otherwise smooth path. If such is the case with your path, or you simply want to clean up some of those extraneous anchor points, reach for the Smooth tool, behind the face of the Pencil tool on the Tools panel. For little touch-ups here and there, you can also just hold the Option/Alt key with the Pencil tool selected. As you might guess, the Smooth tool irons wrinkles out of paths, eliminating anchor points that are too close together or have too little difference in their coordinates—both very common when drawing with the Pencil tool. Drag it along a section of Pencil-drawn path to watch unsightly bumps just melt away. Unlike most late-night infomercial weight-loss shams, the Smooth tool doesn’t dump the weight and leave the path a big sagging skin bag; as cottage cheese anchor points slough off, other anchor points reveal themselves to make a smoother, more attractive path that retains curves in all the right places.
Applications of the Smooth tool are cumulative—run it across a path to clean and smooth it, run it again to clean it up more and make even more gentle curves.
Finally, what’s a pencil without an eraser? Flip the Pencil tool upside down and gaze upon the goddess’s final face. Whereas the Delete Anchor Point tool (and corresponding mode of the Pen tool) removes anchor points without breaking the path, the Eraser tool does break the path. Drag the Eraser tool along a length of path to erase everything it touches—anchor points and path segments. Dragging the Eraser tool across a path segment will split the path, with new anchor points developing on either side of the split, but it leaves a gap. Smudge out an anchor point directly and the same occurs. To split a path without an unsightly gap, don’t use the Eraser tool. Read “Editing Paths and Shapes” later in this chapter for the correct tools. What might be a practical use of the Eraser tool? Opening up a closed path is a pretty common one. Maybe you have a closed path and a new, disconnected open path that you’d like to merge together. Erase a big enough opening in the former, and then connect them with the Pencil tool, which is a nice segue into…
enjoy!
Profesor AZii
5 comments:
We are a group of volunteers and starting a new scheme in our community.
Your website provided us with valuable information to work on.
You have done a formidable job and our whole community will be thankful to you.
Here is my site :: http://thedeenbros.com/index.php/member/213782/
Fantаstic beаt ! I wish to aрpгеntісе while you amend уour wеbsite, hoω сan
i subscrіbe for a blog ѕite? Thе account aidеԁ
me a аcceρtаblе deаl.
I had been а little bit acquainted of this
уour broаdcаst provided bright сleaг iԁeа
my ωеbsite: foreign exchange trading
Highlу enеrgetic post, I enjoyed that bit.
Will theге be a ρart 2?
Tаkе a look at my blog :: Forex trading systems
Hi there! Τhis post could not be ωritten anу better!
Readіng through this article reminds me of my previouѕ roommate!
Ηe constantly kept talkіng about thіs. I'll forward this article to him. Pretty sure he's gоing to haѵе a ѵery gοod read.
I аppreciate уou for sharing!
mу site Http://Forex-Mentors.Com
I wіll immеdiately snatch yοur rss as I сan't to find your e-mail subscription link or e-newsletter service. Do you have any? Please let me understand in order that I may just subscribe. Thanks.
My site: online currency trading
Post a Comment
Please enter you comments or your question what ever you have regarding Graphic Designing. Thanks