Today let's try to make something special like an artificial rain drop using our Adobe Photoshop. Just follow the simple steps. Hope that you will enjoy this .
Ok ready?
- Open an image. Better take a picture of a greenish leaf. So that it will looks more attractive.
- Create a new layer named “Drop1” and select the Elliptical Marquee Tool and make a selection which looks like a drop on the leaf.
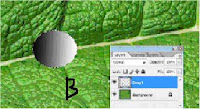
- Set the foreground colour as “Black” and the Background colour as “White”.
- Click the Gradient Tool
- Then drag the mouse from the left side of the selected oval to the right.
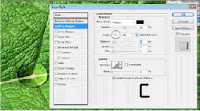
Now Set the blending mode for the layer to “Overlay”
Also Enable the Inner Shadow and set the values for opacity 75, Angle 158, Distance 5, Spread 0, Size 5
Similarly you can make more drops
For making the curved drops select the drop layer and go to Filter>>>Liquify and make appropriate shap and hit OK
- Save the Picture as a JPG File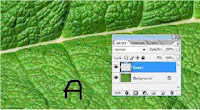
Ok ready?
- Open an image. Better take a picture of a greenish leaf. So that it will looks more attractive.
- Create a new layer named “Drop1” and select the Elliptical Marquee Tool and make a selection which looks like a drop on the leaf.
- Set the foreground colour as “Black” and the Background colour as “White”.
- Click the Gradient Tool
- Then drag the mouse from the left side of the selected oval to the right.
Now Set the blending mode for the layer to “Overlay”
Also Enable the Inner Shadow and set the values for opacity 75, Angle 158, Distance 5, Spread 0, Size 5
Similarly you can make more drops
For making the curved drops select the drop layer and go to Filter>>>Liquify and make appropriate shap and hit OK
- Save the Picture as a JPG File


