The Technical Terms Every Animator Needs to Know
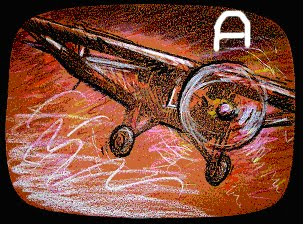
Before beginning an animation project, you must consider the final format your work will be displayed in. Are you working for film, video, or the Web? Will any of the animation frames ever need to be resized for print? Setting the correct size, shape, and resolution for your project from the start is critical to its success. (see fig. A)
 TV cut-off and safe titling
If you are creating animation for television or film, you must make sure that your type is not cropped by the shape of the screen, and that nothing vital in your image is lost. The rule of thumb for layout purposes is to crop a 12-field layout, 1.5 inches all around for TV cutoff, and 2 inches around for title safe. (see fig. B)
Scanning for animation
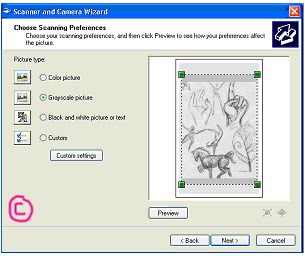
If you draw your animation by hand, you will have to scan it into Corel Painter. Your drawing should be created at the correct dimensions (width to height) for your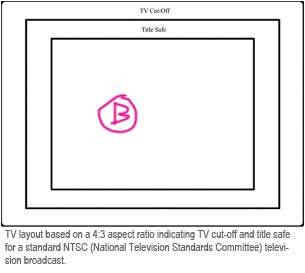 animation. Ten seconds of animation at 30 frames per second can translate into 300 drawings if you create one drawing for every frame of video. It is critical to scan efficiently to handle that volume of artwork. If you are scanning in art to use as final renderings in your animation, you will scan at 72 dpi in RGB at 720 x 486 for NTSC video. However, if you are scanning in to trace, reference, or make a rough pencil test of your motion, get into the habit of scanning at 72 dpi in grayscale, so that your files are small and scan quickly. Depending on your drawings, you may even scan them in as black-and-white line art; the drawings will look jaggy, but if you are only using them as reference to trace from in Corel Painter, that is all you need. This will give you files that take up the least amount of storage space on your computer. (see fig. C)
“Paint” = Bitmaps, “Draw” = Vectors
Computers handle images in two ways: as bitmaps, or as vector images (also known as object-oriented graphics). When working with objects and vectors, the computer keeps a “display list” that describes a series of points in space and their attributes.
Understanding vectors
A vector is a mathematical description of a location in space; as such, it has no actual size. Images described by vectors are resolution independent. They can be rendered at any size and maintain their image quality. The image file only contains a list of vectors and display properties, making vector-based (object-oriented) files very small compared to bitmaps. Eventually, the file has to be converted to a bitmap output. When it is sent to a printer, the raster image processor (RIP) usually handles that task. The display adapter in your computer interprets the image as a bitmap of pixels on your monitor. Some “Paint” programs like Corel Painter and Adobe® Photoshop® let you import vector graphics and turn them into bitmaps (“rasterize” them) so they can be embellished with paint effects. Corel Painter combines the best of both worlds by letting the artist work with both bitmaps and vector based objects.
Before beginning an animation project, you must consider the final format your work will be displayed in. Are you working for film, video, or the Web? Will any of the animation frames ever need to be resized for print? Setting the correct size, shape, and resolution for your project from the start is critical to its success. (see fig. A)
 TV cut-off and safe titling
If you are creating animation for television or film, you must make sure that your type is not cropped by the shape of the screen, and that nothing vital in your image is lost. The rule of thumb for layout purposes is to crop a 12-field layout, 1.5 inches all around for TV cutoff, and 2 inches around for title safe. (see fig. B)
Scanning for animation
If you draw your animation by hand, you will have to scan it into Corel Painter. Your drawing should be created at the correct dimensions (width to height) for your
 animation. Ten seconds of animation at 30 frames per second can translate into 300 drawings if you create one drawing for every frame of video. It is critical to scan efficiently to handle that volume of artwork. If you are scanning in art to use as final renderings in your animation, you will scan at 72 dpi in RGB at 720 x 486 for NTSC video. However, if you are scanning in to trace, reference, or make a rough pencil test of your motion, get into the habit of scanning at 72 dpi in grayscale, so that your files are small and scan quickly. Depending on your drawings, you may even scan them in as black-and-white line art; the drawings will look jaggy, but if you are only using them as reference to trace from in Corel Painter, that is all you need. This will give you files that take up the least amount of storage space on your computer. (see fig. C)
“Paint” = Bitmaps, “Draw” = Vectors
Computers handle images in two ways: as bitmaps, or as vector images (also known as object-oriented graphics). When working with objects and vectors, the computer keeps a “display list” that describes a series of points in space and their attributes.
Understanding vectors
A vector is a mathematical description of a location in space; as such, it has no actual size. Images described by vectors are resolution independent. They can be rendered at any size and maintain their image quality. The image file only contains a list of vectors and display properties, making vector-based (object-oriented) files very small compared to bitmaps. Eventually, the file has to be converted to a bitmap output. When it is sent to a printer, the raster image processor (RIP) usually handles that task. The display adapter in your computer interprets the image as a bitmap of pixels on your monitor. Some “Paint” programs like Corel Painter and Adobe® Photoshop® let you import vector graphics and turn them into bitmaps (“rasterize” them) so they can be embellished with paint effects. Corel Painter combines the best of both worlds by letting the artist work with both bitmaps and vector based objects.
 Understanding bitmaps
Everything in graphics output eventually becomes a bitmap. Bitmap files are large! They have to be—the computer must keep track of the color values of every pixel that makes up the image, not just vectors and attributes. Bitmaps are also resolution-dependent. If you blow up pixels, they just look more obvious. To make a bitmapped image large and smooth, you have to have a finer grid of pixels defining the image. For best results, you must create your image at the correct resolution, or higher. A bitmap is a rectangular grid of dots used to describe an image. It has four basic characteristics:

• Dimension
• Resolution
• Bit depth
• Color model
Resolution
The word “resolution” can be used to describe different things.
Spatial resolution — describes the dimensions of an image in width and height.
Color resolution — often referred to as “color depth” or “bit depth”; refers to how many colors are available to define the image.
Scanner resolution — refers to the number of dots per inch (DPI). If you have to enlarge an image, it should be done on the scanner and not in Corel Painter. DPI is also used for the resolution of printers, describing how many dots per inch the printer can apply to the paper.
Screen resolution — refers to the number of pixels per inch (PPI). Computer monitors can be set for different screen resolutions. The setting determines how many pixels the monitor can display. A large monitor can accommodate a high setting. A small monitor may be easier to see at a lower setting.
Line frequency — also known as “screen frequency”; refers to the number of lines per inch (LPI) that a halftone screen uses to break down a continuous tone image into printable dots for reproduction on a printing press. Low line frequency (large dots) is used for porous papers like newsprint. Coated stock can hold more detail and can take a higher line frequency. Always ask your service bureau what LPI you should be working at.
When you are creating an animation with Corel Painter, consider • the type of animation you are producing, • the requirements of any systems that will process the animation when you are finished with it in Corel Painter, • the final delivery medium of the animation (video, film, Web, CD, QuickTime, AVI, etc.).
 Dimensions or spatial resolution
Bitmaps have two dimensions. They are grids containing picture elements (pixels). The dimensions of a bitmap are described by the number of pixels the bitmap is high and the number of pixels the bitmap is wide.
spatial resolution = width x height
The spatial resolution of a bitmapped image is based on how many pixels in the grid make up each unit of measurement. In Corel Painter, you are working in pixels per inch (PPI). In other words, if you have a one-inch grid, how many pixels is this grid broken up into: 72, 96, or maybe 300? Which would look sharper and have more detail, the 1” grid described by 76 pixels or the 1” grid described by 300 pixels?
The spatial resolution of a bitmapped image is based on how many pixels in the grid make up each unit of measurement. In Corel Painter, you are working in pixels per inch (PPI). In other words, if you have a one-inch grid, how many pixels is this grid broken up into: 72, 96, or maybe 300? Which would look sharper and have more detail, the 1” grid described by 76 pixels or the 1” grid described by 300 pixels?
Color resolution
A bit (binary digit) can describe two states: on and off, black and white, 0 and 1, etc. If 1 bit = 2 colors, 2 bits give you 4 colors, and 8 bits give you 256 colors. That’s 2x2x2x2x2x2x2x2 = 256, or 2 to the power of 8 (28). At 24 bits of information, you have over 16.7 million colors to work with. Each pixel is made of three components: Red, Green and Blue, or RGB for short. We have 8 bits of color for each component, or 256 levels of Red, 256 levels of Green and 256 levels of Blue. Multiply 256 x 256 x 256, and you get 16,777,216 colors. You now know why Corel Painter and other software programs display RGB in values of 0 to 255. If each of the three RGB colors has 8 bits, the image needs 24 bits for all the colors. But what does it mean when you are working with a 32-bit image? What are those other 8 bits for, if they’re not needed to display the RGB colors? They are used for transparency. Certain file formats support “alpha channels.” Having an 8-bit alpha channel means that you can have 256 levels of transparency in your image. Color resolution, or bit depth, affects not only the file size (fewer colors means fewer bits), but also the smoothness of the color gradations in an image.
Compare output colors
Let’s look at an image at different bit depths in Corel Painter using the GIF file format.
1 - In Corel Painter, open a new file, 100 x 100 pixels at a resolution of 72 ppi.
2 - Set the paper color to pure red in the RGB values by setting the red to 255 and the green and blue to 0.
3 - Go to Effects > Tonal Control > Video Legal Colors. Choose NTSC. Notice how different the red looks in NTSC. (see fig. G)
 Visually reduce the number of colors in an image
1- Choose File > Save As and name your image file. Choose the GIF file format, and click Save. Click OK to dismiss the layer warning, if displayed.
2- In the Save As GIF Options dialog box, in the Number of Colors area, choose 256 colors. In the preview window, the image appears in 256 colors.
3- Change the number of colors to 128. In the preview window, the image appears in 128 colors. Continue reducing the number of colors in the graphic until you find the minimum number of colors necessary for adequate display of your image on a Web page.
4- Choose an Imaging Method. Choose Quantize To Nearest Color if you want Corel Painter to look at each pixel for which it doesn’t have the exact color and pick the nearest color for it from the available colors. Choose Dither Colors if you want Corel Painter to apply a pattern to the colors chosen to generate a more accurate, less banded result. In this case, Corel Painter will approximate the color of a larger area of the image, rather than individual pixel colors.
5- You can now either save the graphic to use it on a Web page, or return to Corel Painter to continue working on the image.
Resolution for video
In Corel Painter, when we start a new file, we see a dialog box that requires us to enter a resolution in pixels per inch (PPI), or pixels per centimeter. These pixels represent the number of blocks per inch making up the grid of the bitmap. In video, the default screen resolution is 72 ppi. In addition, it is critical to know the width and height, or spatial resolution necessary for the format you are working in. (see fig. H)
 Resolution for print
The RGB model can describe 256 levels of gray. Remember those gray scales you did? How hard it was to create a gray scale with ten steps, with twenty? Look at this grayscale strip—it is made of 256 levels of gray. Can you tell the difference between all 256 shades of gray?
Most job printing presses can’t reproduce much more than 100 levels of gray. Fine printers can do better if they use top quality materials and papers, and highly controlled press conditions.
Create a grayscale gradient
In Corel Painter, open a new file, 640 x 100 pixels at a resolution of 72 ppi. Fill it with a grayscale gradation from white to black. How many shades of gray can you see? Zoom in on the gradient and examine it closely.
In Corel Painter, open a new file, 640 x 100 pixels at a resolution of 72 ppi. Fill it with a grayscale gradation from white to black. How many shades of gray can you see? Zoom in on the gradient and examine it closely.

2 comments:
Download Corel Painter latest premium Version
Download Corel Painter-- New Version for pc,tablet and laptop
Very Nice Blog this amazing Software.
Thank for sharing Good Luck!
Corel Painter Crack
DriverMax Pro Crack
PGWare SuperRam Crack
Magic ISO Maker Crack
Webroot SecureAnywhere Antivirus Crack
FonePaw Data Recovery Crack
Corel Painter Crack
OutByte PC Repair Crack
Post a Comment
Please enter you comments or your question what ever you have regarding Graphic Designing. Thanks