1. Open a copy of your image and create a Smart Object. Again, pen your image as a Smart Object or convert with the command Layer>Smart Objects>Convert to Smart Object before. When working with Smart Filters, you can later — if necessary — reopen the filter and change the settings
2. Apply the Smart Blur filter.
Set the filter to Quality: High and Mode: Normal. Use settings that remove all the tiny detail in your image (such as pores and individual hairs or blades of grass) but maintain edges and major detail (such as eyes, noses, golf balls, and trees).
3. Define edges with Smart Blur.
Reopen the Smart Blur dialog box and set the Mode pop-up menu to Edge Only. Adjust the sliders until the white-on-black preview shows approximately the amount of detail you want in the final image; then click OK.
4. Invert the colors.
Using the button at the bottom of the Layers palette or the Layer>New Adjustment Layer menu, add an Invert adjustment layer. (Not only is it a good idea to use adjustment layers rather than adjustment commands, but you’ll find that you can’t use most adjustment commands with Smart Objects.)
5. Blur the lines.
Click the Smart Object layer again in the Layers palette to make it active and apply a 1- or 2-pixel Gaussian Blur to soften the edges of the lines. 6. Adjust the thickness of the lines with a Levels adjustment layer. In the Levels dialog box, drag the middle slider control left and right until you’re satisfied with the image’s appearance. If desired, you can further refine the sketch with the Sharpen>Unsharp Mask filter.
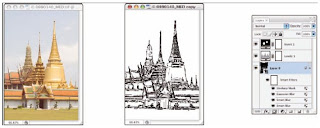
Photoshop: Creating a sketch from a photo.
Simulating a painting in Photoshop is great, but sometimes you might need line art or a sketch. Photoshop has a couple of filters that do a nice job of creating pencil sketches, but none of them really do a great job with outlines. Here’s an easy way to create line art from a photo (see Figure A).
Subscribe to:
Post Comments (Atom)
0 comments:
Post a Comment
Please enter you comments or your question what ever you have regarding Graphic Designing. Thanks