A. Creating Pages
I won’t waste your time by explaining what a page is, that these magenta guides inside the page are your margins, or that the pasteboard is (mostly) a non-printing workspace where you can stick work product items you don’t want on the final print. All that stuff you already know. What I will do, however, is take you on a quick run through of the areas in which I’ve seen even seasoned pros get confused. Along the way, you’ll discover a few lesser-known features and tricks.
Document Setup
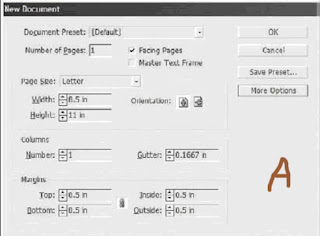
The first place to define document dimensions, number of pages, and the features of pages is the New Document dialog (see Figure A). We’ll jump around the New Document dialog a bit instead of going through it top to bottom.
If you know in advance how many pages you need, it’s often easier to create them all at document inception with the Number of Pages field than to add them later. They can be added later, however, so don’t stress if you’re in the habit of pressing Cmd+N/Ctrl+N and then Return/Enter immediately thereafter.
Down in the Columns section, you can set up a number of equal-width columns and the gutter space between them. This will insert column guides on all pages and, if Master Text Frame is checked, will also match the columns and gutters in the text frame options. Without it checked, you’ll need to manually insert text frames and, if they’re to be multicolumn frames, manually configure them with Object >Text Frame Options.
I won’t waste your time by explaining what a page is, that these magenta guides inside the page are your margins, or that the pasteboard is (mostly) a non-printing workspace where you can stick work product items you don’t want on the final print. All that stuff you already know. What I will do, however, is take you on a quick run through of the areas in which I’ve seen even seasoned pros get confused. Along the way, you’ll discover a few lesser-known features and tricks.
Document Setup
The first place to define document dimensions, number of pages, and the features of pages is the New Document dialog (see Figure A). We’ll jump around the New Document dialog a bit instead of going through it top to bottom.

If you know in advance how many pages you need, it’s often easier to create them all at document inception with the Number of Pages field than to add them later. They can be added later, however, so don’t stress if you’re in the habit of pressing Cmd+N/Ctrl+N and then Return/Enter immediately thereafter.
Down in the Columns section, you can set up a number of equal-width columns and the gutter space between them. This will insert column guides on all pages and, if Master Text Frame is checked, will also match the columns and gutters in the text frame options. Without it checked, you’ll need to manually insert text frames and, if they’re to be multicolumn frames, manually configure them with Object >Text Frame Options.
The Master Text Frame option creates a text frame on the document’s initial master page. The frame will span margin to margin horizontally and vertically and will be placed on every page, ready to be overridden (see later in this chapter for overriding master page items) and filled with text. For documents like books, reports, proposals, and certain catalogs and other publications that require only a single text frame on most pages (with one or more columns), Master Text Frame should be checked. However, for shorter or multistory documents (e.g., newspaper, magazine, most catalogs, and so on), it’s usually better to leave this option unchecked, opting to create text frames manually as needed.
The Margin field accepts any measurement system InDesign understands—points, picas, inches, inches decimal, millimeters, centimeters, ciceros, or agates. When you create a new document, InDesign uses the measurement system and notations from its default preferences; fresh out of the box, that’s pica and points. If you don’t do pica, feel free to type the margin sizes in inches or any other recognized measurement system—just as with page size above it and most of the other measurement fields throughout InDesign. If you’re tired of having to manually override the pica measurements in the New Document dialog and you’d like it to automatically show you inches decimal, ciceros, or another system, cancel creating a new document. Close all other documents, and then go to Edit >Preferences > Units & Increments (Windows) or InDesign >Preferences >Units & Increments (Mac). Change Ruler Units Horizontal and Vertical to the

desired system and click OK. Doing this with all documents closed forces the new measurement system to be the default for all future documents—during the current session and, unless you crash before successfully exiting InDesign, for all future sessions as well. Note that if you reset your preferences, this is among those preferences that go bye-bye.
The chain link icon between the four margin fields links them together such that changing one alters the other three to match. Click the Make All Settings the Same chain link to break the interdependency when you want different margins for top, bottom, and inside and outside or left and right.
Facing vs. Nonfacing PagesIf you’ve got the concept of facing and nonfacing pages down cold, skip this section. Many, many people—including experienced InDesign users—have questions about the distinction and repercussions between checking that box beside the Number of Pages field. It’s to them that this section speaks. Facing pages are any bound document that will have left-read and right-read pages; there’s a spine between the pages, and they face one another (see Figure B). If you’re duplexing, printing on both sides of a page, you probably want to check the Facing Pages option at the top of the New Document dialog. Because facing pages swap edges—odd-numbered pages in English texts are always right-read (pages are to the right of the spine or binding edge) and even-numbered pages are left-read, their margins also swap. Page 1’s right margin becomes page 2’s left margin and vice versa. Therefore, calling the margins left or right is only accurate half the time. Instead, left and right become inside and outside. Inside margin measurements control the distance from the spine (the bind edge) while outside margins specify how far content appears from the trim edge. InDesign will automatically flip the margins between odd- and even-numbered pages—swapping left for right, right for left—between pages.
When Facing Pages is checked in the New Document dialog, the Margins section shows Inside and Outside fields. Uncheck it and you’ll see the field labels change to Left and Right. You’ll want nonfacing pages for any document in which all pages will have a common bind edge. For instance, you might be creating a report where only the right-read pages will be printed upon, leaving their backs blank. That’s a common scenario for velo-, GBC-, spiral-, three-ring-, or even staple-bound documents and reports around an office or courtroom. Deposition transcripts and other evidentiary documents, for instance, are typically one-sided, nonfacing pages.
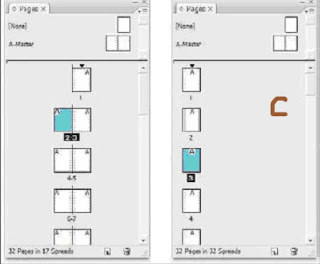 How do you know if the person before you created the document with facing or nonfacing pages? Simple: Look to the Pages panel. A document created with facing pages will have page icons set 2-up on the spine (see Figure C) instead of spineless singles. Even a one-page document displays the difference—page one of a facing pages document will be to the right of the spine. Also note the position of the A master page identifier. It’s positioned on the outside edge of facing pages but centered on nonfacing. If you (or the client) decide to change the layout of a document from facing to non or vice versa after you’ve already begun working, fret not. File >Document Setup contains that and most of the other options from the New Document dialog. You might probably also need to adjust the margins, which can be done through Layout >Margins and Columns......
 How do you know if the person before you created the document with facing or nonfacing pages? Simple: Look to the Pages panel. A document created with facing pages will have page icons set 2-up on the spine (see Figure C) instead of spineless singles. Even a one-page document displays the difference—page one of a facing pages document will be to the right of the spine. Also note the position of the A master page identifier. It’s positioned on the outside edge of facing pages but centered on nonfacing. If you (or the client) decide to change the layout of a document from facing to non or vice versa after you’ve already begun working, fret not. File >Document Setup contains that and most of the other options from the New Document dialog. You might probably also need to adjust the margins, which can be done through Layout >Margins and Columns......
to be continued......................
3 comments:
hi
how to create bleed in the spine please lety me know.
I'm really inspired with your writing talents and also with the layout for your blog. Is that this a paid subject or did you modify it your self? Anyway keep up the excellent quality writing, it's rare to
see a great weblog like this one today..
Review my blog post ... healthy diet plans for women
Graphic Designing Solutions: How To Create Pages In Indesign? >>>>> Download Now
>>>>> Download Full
Graphic Designing Solutions: How To Create Pages In Indesign? >>>>> Download LINK
>>>>> Download Now
Graphic Designing Solutions: How To Create Pages In Indesign? >>>>> Download Full
>>>>> Download LINK yR
Post a Comment
Please enter you comments or your question what ever you have regarding Graphic Designing. Thanks